How to Use an EEA Stapler: Quick Steps
If you’re preparing for a gastrointestinal or colorectal surgery, mastering the use of the EEA (End-to-End Anastomosis) stapler is essential. This specialized surgical device creates secure, leak-resistant connections between hollow organs, most commonly sections of the colon or rectum, by simultaneously deploying staples and excising tissue. Used in procedures like low anterior resection, the EEA stapler improves precision, reduces operative time, and enhances patient recovery. Knowing how to properly handle, align, and fire the device can make the difference between a successful anastomosis and a postoperative complication. In this guide, you’ll learn every critical step, from setup to verification, ensuring safe and effective use of the EEA stapler in the operating room.
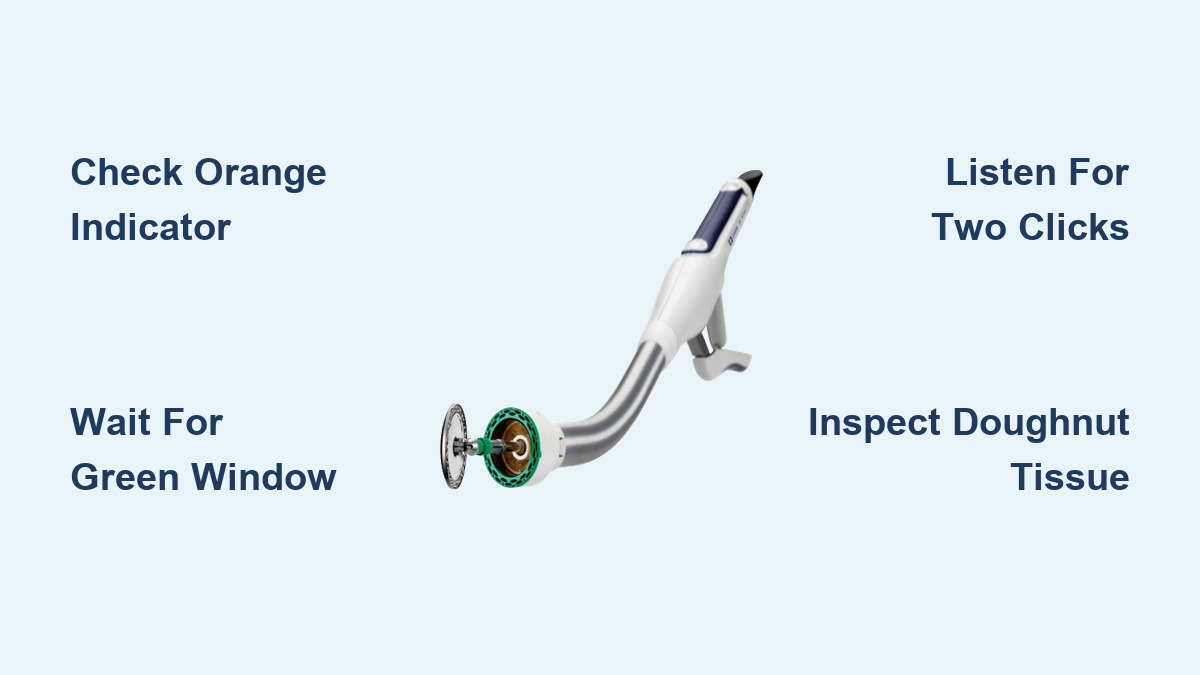
Prepare the EEA Stapler for Surgery
Before using the EEA stapler, thorough preparation is non-negotiable. The scrub technician typically prepares the device on the sterile field, but the operating surgeon must verify readiness. Confirm the correct size and model based on the patient’s anatomy and lumen diameter. Using an improperly sized stapler can lead to stenosis or incomplete apposition. Ensure the device is sterile, undamaged, and within its expiration date. The EEA stapler is a single-use instrument. Never reuse it, even for training purposes outside controlled environments.
Confirm Device Readiness
Start by disengaging the locking mechanism to allow movement. Rotate the opening/closing control counterclockwise (lefty-loosey) until the device fully opens. The anvil should separate completely from the main body. Position the stapler with the anvil facing upward for visibility during loading. Verify all components are functioning smoothly before approaching the tissue.
Check Key Components
Familiarize yourself with these essential parts. The firing mechanism controls staple release when rotated clockwise (righty-tighty). The anvil shapes staples as they deploy and must engage properly before firing. The orange indicator signals anvil engagement, while the green window confirms full closure. Missing any of these signals means the device is not ready. Do not proceed until all indicators are correct.
Position the Patient and Access the Surgical Site
Proper patient positioning directly impacts your ability to use the EEA stapler effectively. Place the patient in the appropriate surgical position, usually supine or lithotomy, depending on the procedure such as abdominoperineal resection or restorative proctocolectomy. Administer general anesthesia and perform standard antiseptic prep and draping of the abdomen and perineum.
Perform Controlled Incision
Make a midline laparotomy or use laparoscopic ports to access the abdominal cavity. Identify the segment of bowel requiring resection. Ensure adequate mobilization so the two ends can be brought together without tension, which is crucial for blood supply and healing. Poor mobilization increases the risk of anastomotic leak due to compromised vascularity.
Access the Target Area
The approach depends on your surgical plan. For low rectal anastomoses, you’ll often use a transanal route for anvil placement. For colon resections, intracorporeal delivery may be preferred. Choose the approach that provides the best visualization and minimal tissue trauma.
Isolate and Prepare the Bowel Ends
Successful anastomosis begins with proper tissue preparation. Locate the proximal (upstream) and distal (downstream) bowel segments to be joined. Confirm both ends are well-perfused, viable, and free of ischemia or excessive tension. Resect the diseased portion using a linear gastrointestinal stapler (GIA), leaving clean, healthy margins.
Ensure Proper Mobilization
Check that the mobilized bowel can reach the anastomotic site without twisting or kinking. Use gentle traction and avoid clamping delicate tissue near the planned connection point. Poor mobilization leads to anastomotic failure even with perfect staple technique.
Assess Tissue Viability
Before proceeding, verify blood supply to both bowel ends. Even a perfectly placed staple line will fail if the tissue lacks blood flow. Use intraoperative techniques like indocyanine green (ICG) fluorescence angiography to assess perfusion before firing.
Load and Insert the Stapler Correctly

Proper insertion prevents complications during firing. Insert the main body of the EEA stapler into the proximal bowel lumen. Advance it carefully to avoid perforation. Secure the bowel around the shaft with a purse-string suture to prevent slippage during firing.
Insert the Main Body into the Proximal Bowel
Pass the main body carefully through the lumen. Ensure the shaft is centered and the bowel is draped evenly. A poorly positioned shaft leads to oblique anastomosis and increased leak risk.
Pass the Anvil into the Distal Segment
In most cases, the anvil is introduced retrograde through the anus and advanced into the distal rectal stump. This transanal approach is common in low rectal anastomoses. Alternatively, the anvil may be delivered intracorporeally during open or laparoscopic surgery. Handle gently to avoid tissue damage.
Bring Bowel Ends Together Over the Shaft
Carefully bring the proximal and distal bowel ends over the stapler shaft, aligning them coaxially. Misalignment results in an oblique anastomosis, increasing the risk of stricture or leakage. Take time to verify alignment before proceeding.
Engage the Anvil and Verify Alignment
Anvil engagement is a critical step that determines anastomotic success. Rotate the opening/closing control counterclockwise (lefty-loosey) to fully extend the anvil toward the main body. As the anvil passes through the distal bowel wall, you’ll feel and hear a slight “pop” when engagement occurs.
Confirm Orange Indicator Visibility
Once engaged, check for the orange indicator. This visual signal confirms the anvil is securely locked to the main body. If the orange mark is not visible, disengage and reassess alignment before proceeding. Never fire without this confirmation.
Align Bowel for Even Apposition
Ensure the bowel is evenly distributed around the stapler shaft. Uneven tissue distribution leads to inconsistent staple formation. Rotate the device if needed to center the tissue and avoid twisting. Visual inspection at this stage prevents problems after firing.
Close the Stapler Gradually

Closing requires patience and attention to feedback. Rotate the closing control clockwise (righty-tighty) to gradually draw the anvil toward the stapler head. Apply steady, controlled pressure. Never force it. Resistance may indicate poor alignment, excessive tissue, or obstruction.
Watch for the Green Window
Continue closing until the green window appears. This visual cue confirms the device is fully closed and ready to fire. Firing before the green window emerges risks incomplete staple formation and anastomotic failure. This step is non-negotiable.
Reassess if Resistance Occurs
If you encounter resistance, pause and inspect tissue alignment. Check for omentum, mesentery, or fat caught in the jaws. Adjust positioning and continue slowly. Forcing the mechanism damages the device or tears tissue. Stop, reassess, and correct before continuing.
Fire the Stapler with Precision
Firing deploys staples and excises tissue in one motion. Ensure the locking mechanism is disengaged before firing. A locked device cannot activate, and attempting to fire it may cause mechanical strain or misfire.
Activate the Firing Mechanism
Turn the firing knob clockwise (righty-tighty) in a smooth motion. Listen carefully for two distinct clicks. The first click deploys staples, followed by a half-turn pause, then the second click activates the cutting blade. Full turn completes the sequence. These auditory signals confirm complete actuation.
Stop When Clicking Ends
Once the second click is heard and no further movement occurs, the firing process is complete. Do not over-rotate. The device automatically opens slightly to allow safe removal. Additional rotation risks tissue trauma.
Remove and Inspect the Stapler
After firing, handle the stapler with extreme care. Grasp the device firmly and pull it straight out to avoid snagging or tearing the fresh anastomosis. The staple line is fragile at this stage.
Examine the Doughnut Tissue
Inspect the excised circular tissue (the “doughnut”) from both proximal and distal sides. A complete doughnut indicates full-thickness resection. A partial or irregular doughnut may suggest uneven closure or misfiring. Absence of a doughnut raises concern for incomplete anastomosis. Retain the specimen for surgical pathology if required.
Document Findings
Record the appearance of the doughnut and any anomalies. This documentation matters for postoperative management and if complications arise later.
Verify Anastomotic Integrity
Anastomotic leak is a serious complication. Thorough verification before closing is essential. Examine the anastomosis site under direct vision. Look for uniform staple lines, check for gaps or puckering, and assess bleeding. Surrounding tissue should be pink and pulsatile, indicating good perfusion.
Perform Intraoperative Leak Test
Two common methods exist. For the air leak test, clamp the distal rectum, insert a rectal tube, and insufflate air while submerging the anastomosis in saline. Observe for bubbles indicating a leak. For the methylene blue test, instill blue solution via the rectum and watch for dye leakage through the staple line. If a leak is detected, reinforce with interrupted seromuscular or full-thickness sutures.
Make Final Assessment
Based on visual inspection and leak testing, decide whether to proceed or reinforce the anastomosis. When in doubt, add sutures. A reinforced anastomosis is far better than a leaking one.
Follow Critical Safety Protocols
Safety protocols exist to prevent catastrophic complications. Never force the mechanism. Resistance during closing or firing is a red flag. Forcing the device damages internal components, tears bowel tissue, and causes incomplete staple formation.
Rely on Visual and Auditory Cues
Three key safety indicators exist. The orange indicator confirms anvil engagement. The green window confirms full closure. Two clicks confirm successful firing. Missing any one of these signals means the device is not ready. Do not proceed without all three.
Use Correct Stapler Size
Choose the appropriate diameter (25mm, 28mm, or 31mm) based on lumen size. Too small causes stenosis. Too large causes poor tissue apposition. Your surgical judgment and preoperative imaging should guide selection.
Optimize Results with Pro Tips
Master surgeons follow specific principles for consistent success. Remember the righty-tighty rule: rotate clockwise to close and fire. Rotate counterclockwise to open. This simple mnemonic prevents accidental misoperation, especially under stress.
Coordinate with the Scrub Team
Ensure the scrub nurse knows the sequence and can anticipate needs. Have sutures ready for purse-string closure. Keep saline nearby for leak testing. Maintain sterility throughout. Clear communication prevents delays and errors.
Prioritize Training
The EEA stapler requires hands-on practice. Participate in supervised cases and simulation labs before performing solo anastomoses. Familiarity reduces complications. No surgeon should use this device for the first time on a patient without observation.
Frequently Asked Questions About Using an EEA Stapler
What is the difference between the orange indicator and green window on an EEA stapler?
The orange indicator appears when the anvil is properly engaged with the main body of the stapler. The green window shows only when the device is fully closed and ready to fire. Both must be present before activation.
How do I know if the EEA stapler fired correctly?
Listen for two distinct clicks during firing. The first click deploys the staples, and the second click activates the cutting blade. Once clicking stops, firing is complete. Inspect the doughnut tissue to confirm full excision.
Can I reuse an EEA stapler if it appears undamaged?
No. The EEA stapler is a single-use device. Reuse is unsafe and violates medical device regulations. Even,外观完好 may have internal damage affecting function.
What should I do if I encounter resistance while closing the EEA stapler?
Stop immediately. Forcing the mechanism can damage the device or tear tissue. Reassess tissue alignment, check for caught omentum or mesentery, and adjust positioning before continuing slowly.
How do I perform an air leak test on an EEA anastomosis?
Clamp the distal rectum, insert a rectal tube, and insufflate air while submerging the anastomosis in saline. Bubbles indicate a leak requiring suture reinforcement.
What size EEA stapler should I use for a low rectal anastomosis?
Size selection depends on the patient’s lumen diameter. Common sizes are 25mm, 28mm, and 31mm. Preoperative imaging and intraoperative assessment guide selection. Too small causes stenosis; too large compromises tissue apposition.
Key Takeaways for Using an EEA Stapler Successfully
The EEA stapler is a powerful tool that significantly enhances surgical outcomes in colorectal procedures when used correctly. Success hinges on meticulous preparation, strict adherence to visual and auditory safety cues, and a disciplined step-by-step approach. From patient positioning to post-firing leak testing, every phase matters. Never skip the orange indicator check, green window verification, or the two-click firing confirmation. These three cues are your safety net against catastrophic failure.
Master the righty-tighty, lefty-loosey principle to avoid operational errors under stress. Coordinate with your scrub team, prioritize tissue perfusion assessment before firing, and always perform leak testing before closing. Training is essential. Participate in supervised cases and simulation labs before performing independent anastomoses.
By mastering the principles outlined here, proper loading, anvil engagement, green window confirmation, and two-click firing, you ensure safer, more reliable anastomoses. Prioritize training, teamwork, and verification to protect your patients and elevate your surgical practice. The EEA stapler, when handled with care and precision, delivers excellent outcomes in experienced hands.