How to Use a Stapler Remover: Quick Steps
Staples hold documents together, but removing them without tearing paper or risking injury requires the right tool and the right technique. A staple remover is designed to extract staples cleanly and safely from paper, cardboard, and even wood. Yet many people still use outdated claw-style removers that damage pages or rely on improvised methods like scissors or knives, which can be dangerous.
Knowing how to use a stapler remover correctly makes a big difference in document preservation, efficiency, and workplace safety. Whether you’re handling sensitive office paperwork, reorganizing classroom materials, or cleaning up after a renovation, using the proper remover with the correct method prevents unnecessary holes, hand strain, and accidents. This guide covers everything you need, from identifying your tool type to mastering front-side and back-side removal.
Choose the Right Staple Remover for Your Needs

Selecting the appropriate staple remover is the first step toward clean, safe staple extraction. The wrong tool can damage documents and cause frustration.
Jaw-Style vs. Push-Style Tools
Two main types dominate modern use. Both work well but serve different situations.
Jaw-style removers have four prongs that grip the bent legs of a staple from the back of the document. They apply even pressure, reducing the risk of tearing. This makes them ideal for bulk document editing when flipping pages is acceptable.
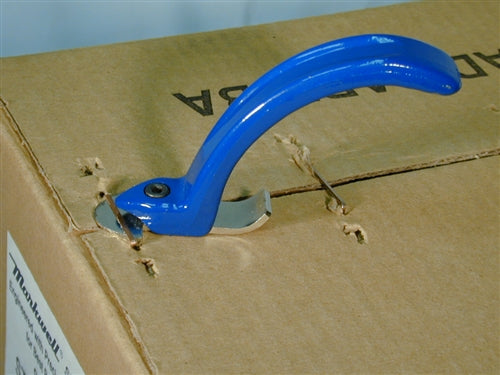
Push-style removers feature a flat, chisel-like tip that slides under the crown of the staple from the front. This allows removal without flipping the paper, which is perfect for fragile or numbered documents.
Avoid Claw-Style Removers
Older claw-style removers use sharp, pinching jaws that dig into paper. These often cause dents, tears, and misalignment. Users consistently report poor control and increased damage compared to modern alternatives.
Key Features to Look For
When selecting a remover, prioritize these functional upgrades.
A magnetic tip holds removed staples securely, preventing them from falling and creating hazards. A staple grabber notch keeps staples from falling during extraction. An ergonomic grip reduces hand fatigue during repeated use. Compact size fits in drawers, pockets, or toolkits.
High-performing models like the Bostitch Magnetic or Swingline SWI-38101 combine durability with user-friendly design, making them top choices across offices and schools.
Remove Staples from Paper Using the Back-Side Method
The back-side method works best with jaw-style removers when you can flip the document. This technique provides maximum grip and control.
Position the Jaws Correctly
Flip the document so the back side is visible, where the staple legs are bent outward. Position the jaws of the remover directly over the two staple legs. Keep the tool perpendicular to the paper for maximum grip and stability.
You should see both prongs seated snugly around each leg before squeezing.
Squeeze the Handles Firmly
Apply firm, even pressure to close the jaws. This action grips and slightly straightens the staple legs, loosening their hold in the paper. Do not crush the handles, as over-squeezing can deform the paper or misalign the tool.
This step takes less than two seconds once properly aligned.
Lift and Wiggle the Staple Free
After gripping, lift upward while maintaining light pressure. If the staple does not come out fully, flip the paper and use your fingernail or tweezers to pull it through. A gentle side-to-side wiggle helps guide it out without enlarging the holes.
For rusty or corroded staples, move slowly. Rapid force may break the staple, leaving fragments behind.
Dispose of Staples Immediately
Place removed staples in a trash can or dedicated container. Never leave them loose on desks or floors, as staples are sharp and pose puncture hazards, especially in shared spaces.
Remove Staples Without Flipping Using the Front-Side Method
The front-side method works with push-style removers and keeps documents face-up. This is ideal when flipping would disrupt page order or risk damaging delicate materials.
Position the Tool on the Staple Crown
Keep the document face-up, with the curved top of the staple clearly visible. This method is perfect for old reports, posters, or any material where page order matters.
Slide the Tip Under the Staple
Gently insert the flat tip of the push-style remover under the front part of the staple crown. Press the tool flat against the paper surface to ensure full contact and prevent slipping.
The metal should lie flush with the paper. If it is angled, reposition before lifting.
Lift Up and Away from Your Body
Use a smooth, controlled motion to lift the tool upward and slightly away from your body. The leverage pries the staple out cleanly. Thanks to the flat-tip design, this method minimizes surface damage and avoids punctures.
Capture and Release the Staple
If your remover has a magnetic tip or staple grabber, the extracted staple will stay attached. Simply tilt the tool over a trash can to release it. Repeat for additional staples, ensuring consistent alignment each time.
Magnetic models reduce cleanup time and eliminate dropped staples, making them ideal for high-volume environments.
Handle Special Materials and Surfaces
Standard paper removal techniques do not work for all materials. Different surfaces require different approaches.
Extract Staples from Wood
In renovation or flooring work, staples often remain embedded in subfloors after carpet removal. Standard paper removers are not enough for this task.
Use a flathead screwdriver or pry bar to gently lift the staple head first. Follow with pliers or a jaw-style remover to grip and extract the staple completely.
Always wear protective gloves and closed-toe shoes when working with wood staples.
Work with Cardboard and Packaging
Heavy-duty staples in shipping crates require industrial-grade removers with reinforced steel and high-leverage handles. Standard office tools may bend or fail under pressure.
Use a dual-density rubber-handled remover for better grip and torque control when dealing with packaging materials.
Maintain Bulletin Boards and Displays
When removing staples from cork or foam boards, use a gentle wiggling motion to avoid crumbling the surface. Push-style removers with narrow tips offer precision and reduce board damage.
Some models also remove push pins or tacks, so check manufacturer specs for versatility.
Prevent Damage and Improve Safety
Using the right tool is only part of the equation. Proper technique prevents document damage and keeps you safe.
Avoid Common Mistakes
Even with the right tool, improper use can ruin documents. Steer clear of these errors.
Twisting or yanking the remover causes paper tears and enlarged holes. Applying excessive force increases the risk of slippage and injury. Using dull or corroded tools reduces grip and effectiveness.
Controlled, gentle motion works better than brute force.
Protect Delicate and Historical Documents
For archival or valuable materials, avoid standard removers altogether. Use fine-tipped tweezers if the staple legs are already bent. Opt for archival-grade tools designed for fragile paper. Work under good lighting to see staple positioning clearly.
Libraries and museums often use micro-spatulas for ultra-delicate removal.
Keep Hands and Workspaces Safe
Always lift the tool away from your body to minimize injury if it slips. Keep fingers clear of the staple path, especially during extraction.
Scattered staples on floors or desks can cause injuries. Use containers or magnetic trays to collect them immediately.
Maintain Your Staple Remover
Regular maintenance keeps your tool working reliably for years. Simple care prevents rust, debris buildup, and mechanical issues.
Clean After Each Use
Wipe the metal parts with a dry or slightly damp cloth to remove paper fibers and dust. Check the jaws or tip for lodged debris, and use a soft brush if needed.
Never soak the tool in water or use harsh chemicals, as this can cause rust or degrade rubber grips.
Store in a Dry Place
Keep the remover in a desk drawer, toolkit, or case away from moisture. High humidity accelerates corrosion, especially on steel components.
If carrying in a bag, use a protective sleeve to prevent damage to other items.
Lubricate the Hinge When Needed
Most removers have a simple pivot joint that rarely needs maintenance. However, if the handle feels stiff, apply a single drop of light machine oil to the hinge. Open and close the tool several times to distribute the oil.
This is only necessary after heavy use or long-term storage.
Upgrade for Better Performance

Modern staple removers offer features that make removal faster, safer, and more convenient. Upgrading improves your workflow significantly.
Invest in Magnetic Models
Removers with neodymium magnets automatically hold staples after extraction. This feature is a game-changer in shared offices or classrooms, where loose staples pose a hazard.
The Bostitch Professional Magnetic Staple Remover combines grip comfort, magnet strength, and durability.
Choose Ergonomic Designs
Tools with textured, rubberized handles reduce hand strain during prolonged use. Look for models with wide finger grips, as they provide better leverage and control.
Ergonomic removers cut fatigue by up to 40% during high-volume tasks like report revisions or exam paper sorting.
Match Tool to Task
For standard office work, use push-style or jaw-style removers. For packaging and crates, choose heavy-duty industrial models. For classroom and bulletin boards, opt for lightweight, magnetic versions.
Replace old claw removers, as modern alternatives are safer, faster, and kinder to paper.
Frequently Asked Questions About Staple Removers
What is the easiest way to remove a staple without tearing paper?
Use a push-style staple remover. Keep the document face-up, slide the flat tip under the staple crown, press flat against the paper, and lift up and away from your body. This method minimizes punctures and tears.
Can I use a stapler remover on cardboard?
Yes, but you need a heavy-duty model. Standard office removers may bend or fail on thick cardboard. Use industrial-grade removers with reinforced steel and high-leverage handles for packaging materials.
How do I remove a rusty staple?
Move slowly when dealing with rusty or corroded staples. Use a jaw-style remover, grip the legs gently, and work the staple back and forth to loosen it. Avoid rapid force, which can break the staple and leave fragments in the paper.
Are magnetic staple removers worth it?
Yes, magnetic models are worth the investment for most users. They capture staples automatically, reducing cleanup time and eliminating loose staples that pose safety hazards. They are especially useful in offices and classrooms.
Can I use a stapler remover on fabric or cork boards?
Yes, push-style removers work well on fabric and cork boards. Use a gentle wiggling motion to avoid crumbling the surface. Narrow-tip models offer precision and reduce damage to bulletin board materials.
Key Takeaways for Using a Staple Remover
Mastering how to use a stapler remover is about preserving documents, protecting your hands, and working efficiently. Choose the right tool type for your specific needs. Push-style removers work best for face-up removal, while jaw-style removers excel when back-side access is available. Avoid claw-style removers entirely, as they cause unnecessary damage.
Always dispose of removed staples immediately in sealed containers. For special materials like wood or cardboard, use appropriate heavy-duty tools. Maintain your remover by keeping it clean and stored in a dry place.
By following these guidelines, you turn a simple task into a seamless part of your workflow. Whether you are in an office, classroom, or renovation site, the right approach makes all the difference.