How to Use a Carpet Stapler: Step-by-Step Guide
If you’re installing wall-to-wall carpet or securing padding, knowing how to use a carpet stapler correctly is essential. A carpet stapler ensures your carpet stays taut, wrinkle-free, and securely anchored, especially along edges and in high-traffic areas. Whether you’re using a pneumatic, electric, or manual model, improper technique can lead to visible dimples, loose seams, or even safety hazards. This guide walks you through the right tools, safety steps, and professional techniques to get flawless results.
You’ll learn how to load staples safely, separate the nap from the backing, drive fasteners without damaging fibers, and avoid common mistakes that ruin finishes. Every section provides actionable steps you can apply to your specific project, whether you’re a first-time DIYer or a seasoned pro.
Choose the Right Carpet Stapler for Your Project

Selecting the correct carpet stapler depends on your project size, skill level, and flooring setup. The four main types each serve different purposes.
Pneumatic Staplers for Professional Results
Pneumatic carpet staplers deliver consistent power and speed, making them best for large rooms and commercial jobs. They require an air compressor operating at 70 to 100 PSI and are ideal for professionals who need to work quickly across extensive areas.
The Bostitch MIIIFS stands out with its 92-staple magazine and depth adjustment feature. However, beginners should avoid pneumatic models because high pressure increases injury risk if the tool is mishandled. These staplers excel when you need speed and uniformity across thousands of square feet.
Electric Staplers for Home DIY Projects
The ROBERTS Electric Carpet Stapler offers quiet, reliable performance without the hassle of an air hose. This lightweight option maneuvers easily in tight spaces like stairs and closets, making it perfect for residential installations.
Cordless electric models provide mobility, but check battery life before starting your project. Always plug into a GFCI outlet to prevent electrical shocks, especially in areas near moisture.
Manual Staplers for Small Repairs
For tight budgets or minor repairs, manual staplers like the REXBETI 4-in-1 work well. They’re portable, require no power source, and give you complete control over each staple. However, use them only on small areas because large rooms will exhaust you quickly.
Slap Staplers for Underlay Only
Slap staplers drive fasteners when you strike the tool against the floor. They’re cheap and simple but produce inconsistent results. Reserve them for securing underlay, not finished carpet, because misfires and double shots are common problems.
Pro Tip: Never use a framing or upholstery stapler for carpet. Only tools designed specifically for carpet ensure correct staple size and depth for your flooring.
Gather Essential Tools and Materials
Having the right gear ready prevents frustrating interruptions mid-job. Preparation is half the battle in any carpet installation.
Must-Have Tools for Carpet Installation
You need several specialized tools beyond the stapler itself to complete a professional installation. Gather these items before starting your project.
A knee kicker or power stretcher is essential for pulling carpet taut before fastening. A carpet knife and seam roller help with cuts and seam sealing. You’ll also need a tape measure, putty knife, broom handle for smoothing large areas, and a regular hammer for tapping in any stray staples.
Critical Materials to Purchase
Tack strips form the anchor system around your room perimeter. You’ll need both full strips and half-strips for doorways. Carpet padding adds cushioning and extends carpet life. For fasteners, stock up on 18-gauge staples with 3/8″ to 9/16″ leg length. Use divergent (claw) staples for high-traffic zones where pull-out resistance matters most. Seam tape and an iron complete the list for joining carpet sections.
Prep Note: Let new carpet acclimate in the room for 24 hours before installation. This reduces shrinkage and improves stretchability for a tighter final fit.
Follow Strict Safety Protocols
Carpet staplers fire fasteners at high speed, making safety non-negotiable. Taking shortcuts leads to injuries and damaged materials.
Wear Proper Protective Equipment
Always wear safety glasses to protect eyes from flying staples. Add hearing protection when using pneumatic models since they generate significant noise. Wear closed-toe shoes and avoid loose clothing that could catch in the tool.
Handle Power Tools Safely
For electric staplers, use a GFCI outlet and never operate in wet conditions. Inspect the cord for damage before each use. For pneumatic tools, disconnect the air hose before loading staples or clearing jams. Depressurize the system completely before detaching the hose.
General Safety Rules to Remember
Keep fingers off the trigger until you’re ready to fire. Engage the safety lock when the tool sits idle. Never point the stapler at yourself or others. Store loaded staplers securely and never leave them unattended.
Warning: Over 60% of tool injuries happen during loading or clearing jams. Always disconnect power or air source before performing any maintenance.
Prepare the Subfloor and Tack Strips
A smooth, stable base ensures a professional finish that lasts for years. This preparation step is where many DIY installations go wrong.
Clean and Repair the Subfloor
Remove all old flooring, nails, screws, and debris before proceeding. Repair any squeaky or uneven boards by securing them to the joists below. Sweep and vacuum thoroughly to eliminate all dust and grit. The surface must be dry, level, and structurally sound before you lay any materials.
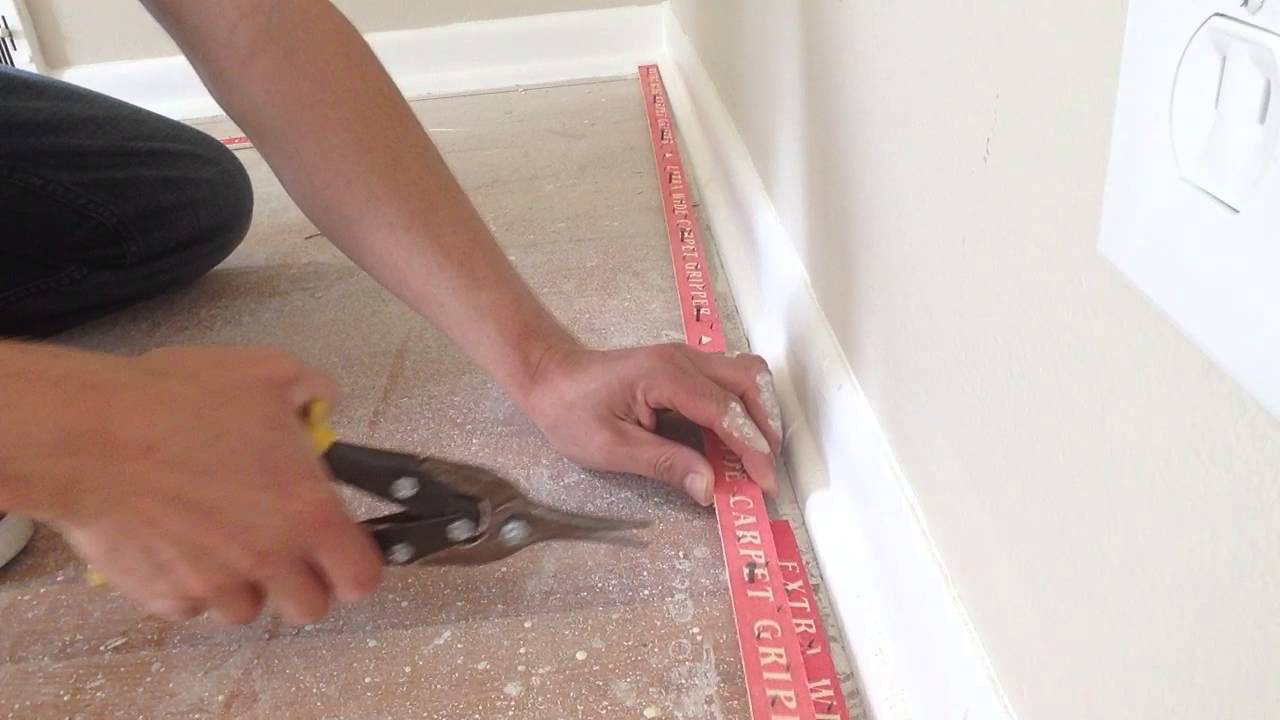
Install Tack Strips Correctly
Place full tack strips 2 inches from the wall around the entire perimeter. Cut half-strips (8 inches long) for doorways where you need shorter anchoring points. On stairs, cut strips 1 inch shorter than the tread width. Angle the barbs toward the wall so they grip the carpet backing properly when you stretch the carpet into place.
Secure strips with staples every few inches, targeting the subfloor behind the strips. Do not staple into baseboards, which will split and fail over time.
Key Insight: Tack strips anchor the entire carpet installation. Misalignment causes edge lifting, wrinkles, and premature failure.
Load Staples Correctly and Safely
Using wrong staples causes jams and weak holds that ruin your finished work. Follow loading procedures precisely.
Use Correct Staple Specifications
Carpet staplers use 18-gauge narrow crown staples with leg lengths between 3/8″ and 9/16″. Divergent (claw) staples provide superior grip in high-traffic areas because they twist open inside the material. Never use staples longer than 9/16″ because they may pierce through and damage the carpet surface visible to occupants.
Load Staples in the Right Orientation
Turn the stapler upside down and pull out the magazine. Insert staples with legs pointing upward (points facing up). Slide the magazine back until it clicks into place. Release the trigger lock before use. Never load while the tool is connected to power or air, and inspect each staple for bends or damage that could cause jams.
Critical Rule: Always load staples upside down with points facing upward. This orientation ensures proper feeding and drive angle.
Master the Stapling Technique
Proper technique prevents dimples, puffy edges, and weak fastening that compromise your installation quality.
Separate the Nap Before Stapling
Lift the carpet fiber layer (the nap) and pull the backing forward before positioning each staple. This creates space so staples grip the backing without compressing the fibers. Stapling without separating the nap causes visible dimples and unprofessional edges that detract from the finished appearance.
Position and Drive Staples Properly
Hold the stapler flat against the wall, not angled. The nose should contact the tack strip or subfloor directly. Fire staples straight in at 90 degrees, not slanted, to maximize holding power. Space fasteners 2 to 3 inches apart along the perimeter. Slightly overlap for dense clusters in high-stress areas.
Reinforce corners, doorways, and stairs with extra staples because these areas experience the most stress and movement over time.
Pro Tip: Never staple into baseboards. Target the subfloor just behind them for secure fastening that won’t split trim.
Apply Staples in Key Areas
Different zones require specific approaches to ensure lasting results throughout the installation.
Wall-to-Wall Carpet Edges
After stretching with a knee kicker, pull carpet tight against the tack strip. Separate the nap and staple every 2 to 3 inches. Use a putty knife as a guide to trim excess carpet cleanly along walls.
Staircase Installation
Install tack strips on the back edge of treads. Stretch padding and staple every 3 inches along edges. Use a kicker to push carpet into the tread-riser seam. Staple through the backing into the subfloor, placing staples between fibers. Trim carefully after securing all steps.
Underlay Fastening
Use a slap or manual stapler to secure padding. Stretch it taut before stapling. Fasten every 3 inches along edges and seams. Avoid overlapping with tack strips, and never staple through both padding and carpet unless the manufacturer specifies it.
Avoid Common Installation Mistakes
Even small errors ruin the final look and compromise durability. Learn what to watch for.
Don’t Trap Fibers Under Staples
Trapping nap fibers under staples causes puffy edges and permanent dimples. Always separate the backing from the nap first. This step takes seconds but makes the difference between professional and amateur results.
Maintain Consistent Spacing
Gaps between staples lead to lifting and movement. Stick to 2 to 3 inch intervals throughout. Use a marked tape measure as a guide to maintain consistency.
Never Overdrive Staples
Staples should grip the subfloor or tack strip without piercing through. Test depth on scrap material first. Adjust the driving depth if needed on your specific model.
Skip Baseboard Fastener Placement
Nailing into baseboards looks bad and fails over time as wood expands and contracts. Target the subfloor just behind the trim instead.
Pro Tip: Walk the perimeter after stapling and tug lightly to check for looseness. Re-kick and restaple any weak spots before finishing.
Troubleshoot Frequent Issues
When problems arise, fix them quickly to maintain progress and avoid rework.
Clear Staple Jams Fast
Disconnect power or air first. Open the magazine and remove obstructions with needle-nose pliers. Reload with correct staples. The cause is usually wrong staple size or debris in the channel.
Fix Incomplete Penetration
Staples not fully driven usually indicate low air pressure (should be 70 to 100 PSI), weak battery charge, or poor staple quality. Check these items and test on scrap wood to recalibrate.
Stop Staples Piercing Through
Lower the depth setting. Use shorter staples (never exceeding 9/16″). Test on a scrap piece before continuing.
Handle Misfires
If the tool won’t fire, check whether the safety lock is engaged. Ensure power or air is connected. Verify the magazine is fully seated.
Maintain Your Stapler for Longevity
Proper care extends tool life and prevents failures when you need the stapler most.
Clean After Every Use
Inspect the magazine and nose for debris. Wipe down the body. For pneumatic models, clean air filters and lubricate moving parts as the manufacturer recommends.
Store Properly
Keep in a dry, dust-free place. Remove staples before storage to prevent moisture damage and spring fatigue. Never leave the stapler loaded when putting it away.
Replace Worn Parts Promptly
Springs, drivers, and O-rings wear over time, especially on high-use pneumatic models. Replace them before they cause jams or inconsistent driving.
Final Tips for Professional Results
End with a flawless installation using these expert strategies.
Reinforce Stress Zones
Add extra staples in doorways, hallways, stair bullnoses, and room corners. Use divergent (claw) staples in these areas because they twist open inside the wood for superior grip.
Work Clean and Tidy
Vacuum the subfloor regularly during installation. Keep tools organized. Trim excess carpet neatly with a sharp knife.
Inspect Before Finalizing
Walk the entire perimeter and look for loose edges, bubbles, visible staples, or gaps at transitions. Re-kick and restaple any weak spots. Run your hand along the edge; no give means a secure fit.
Final Check: A properly stapled carpet feels solid underfoot with no movement or ripples. If you detect any looseness, address it before completing the job.
Frequently Asked Questions About Using a Carpet Stapler
What type of stapler is best for beginners?
An electric carpet stapler like the ROBERTS model is best for beginners. It offers consistent power without the learning curve of pneumatic tools. The lightweight design and quiet operation make it approachable for first-time users.
How far apart should I space carpet staples?
Space carpet staples 2 to 3 inches apart along the perimeter. Closer spacing (about 2 inches) works better in high-traffic areas and on stairs where movement is frequent.
Can I use a regular staple gun on carpet?
No, regular staple guns use wrong staple sizes and driving depths. Only use carpet-specific staplers designed for 18-gauge narrow crown staples with 3/8″ to 9/16″ leg lengths. Using the wrong tool causes dimples, fiber damage, and weak holds.
Why is my carpet stapler jamming?
Jams occur from wrong staple sizes, overfilling the magazine, bent staples, or debris in the feed mechanism. Always load staples upside down with points facing upward, and inspect each staple before loading.
Do I need to separate the carpet nap before stapling?
Yes, always separate the nap (visible fibers) from the backing before stapling. This prevents fibers from being trapped under staples, which causes visible dimples and puffy edges.
How do I know if staples are driven at the correct depth?
Test on scrap material before starting. Staples should grip the subfloor or tack strip without piercing through the carpet backing. Adjust the depth setting if staples go too deep or sit proud.
Key Takeaways for Using a Carpet Stapler
Successfully using a carpet stapler requires choosing the right tool type for your project, loading proper 18-gauge staples correctly, and separating the nap from backing before each staple. Drive fasteners straight in at 90 degrees, space them 2 to 3 inches apart, and reinforce corners, doorways, and stairs with extra fasteners. Never staple into baseboards, always test depth on scrap material first, and wear safety glasses throughout the process. Following these steps ensures a tight, lasting carpet installation with no visible flaws, whether you’re a DIY homeowner or a professional installer.