How to Use a Bostitch Stapler: Quick Guide
If your documents keep falling apart or you are dealing with hand fatigue after stapling, you are not alone. Many users overlook the simple but critical steps that make a Bostitch stapler work smoothly. Whether you are using an electric, spring-powered, or manual desktop model, knowing how to use a Bostitch stapler correctly can save time, prevent jams, and extend the life of your tool. This guide walks you through every essential step from loading staples the right way to troubleshooting common issues so you get clean, consistent results every time.
You will learn how to position paper correctly, fire the stapler safely, and remove mistakes with the built-in remover. Whether you are in an office, classroom, or home workspace, mastering your Bostitch stapler means faster workflows, less frustration, and professional-looking results.
Prepare Your Stapler
Before loading or stapling, set up your Bostitch stapler properly to ensure smooth operation and avoid early jams.
Check Power Source for Electric Models
If you are using an electric Bostitch stapler, plug it into a standard wall outlet before starting. These models rely on Impulse Drive technology for automatic stapling, so they will not function without power. Place the unit on a flat, stable surface with enough space around it for safe operation. The suction cup feet will grip the desk, preventing movement during use.
Pro Tip: Always test the power connection by opening and closing the stapler once after plugging in. This resets the sensor and ensures the stapler is ready to fire.
Open the Magazine for Loading
To load staples, pull apart the top and bottom sections of the stapler. On most models, the top half swings open easily, and some electric versions have a release button at the back that unlocks the front-loading magazine for quicker access.
Warning: If staples are already inside, open slowly to prevent them from spilling out. Misaligned staples increase jam risk.
Load Staples Correctly

Improper staple orientation is the number one cause of jams. Follow these steps to load your Bostitch stapler the right way.
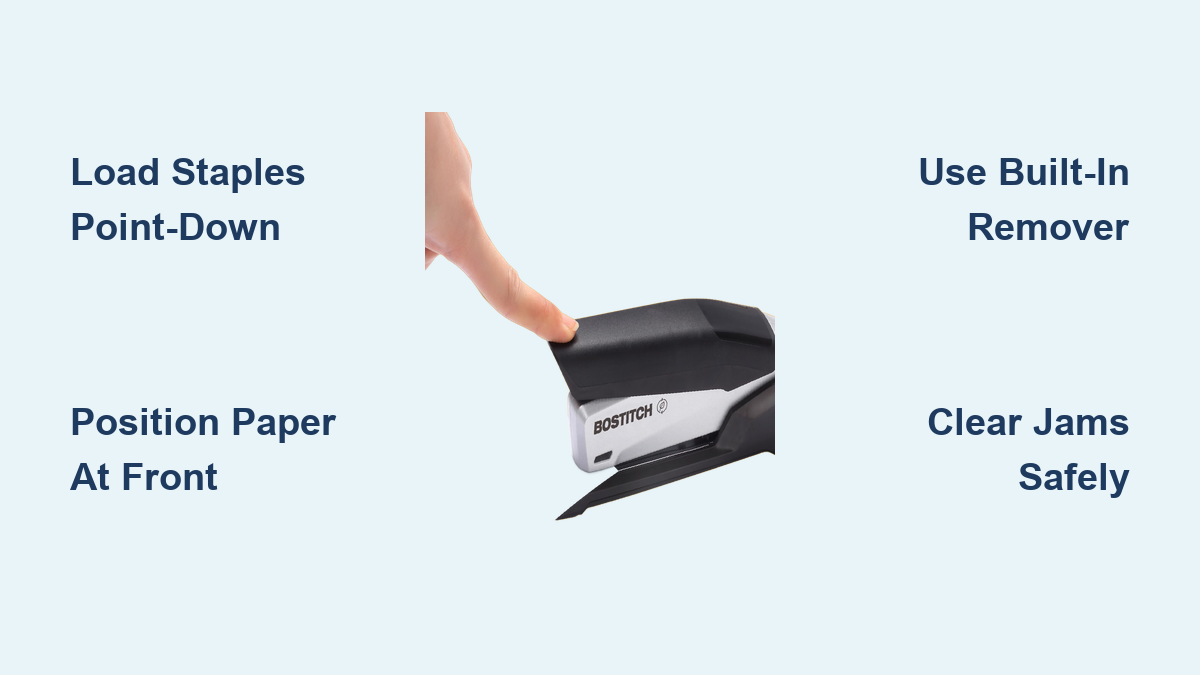
Insert Staples Point-Down
Place new staples into the magazine, which is the internal track that feeds them to the firing mechanism. Orientation matters.
Points facing down toward the anvil or baseplate is the correct position. The notched side of the crown should face the bottom of the stapler. Legs should follow a down, across, up path, matching existing staples in the magazine.
This ensures the driver hits the crown properly and pushes the legs through the paper without bending.
Never force bent or twisted staples into the magazine. They can wedge in the feed path and cause a jam.
Remove Old Staples First
If old staples remain in the magazine, take them all out before adding a fresh strip. Reusing partial strips is fine, but mixing used and new staples can lead to misalignment. Set aside usable staples for later use.
Seat and Close the Magazine
After inserting the staple strip, push it all the way in until it clicks or seats firmly against the backstop. Then, press the top section down until it clicks shut. It should close evenly with no gaps or tilting.
Visual Cue: If the stapler wobbles or does not latch, reopen and check for obstructions or misloaded staples.
Access Extra Staples Quickly
Many Bostitch models include built-in storage so you are never caught without spares.
Look for a small compartment beneath the body of the stapler. Slide or lift the cover to reveal space for extra staple rolls. Electric models may also store spare sticks in the front-load magazine housing.
Keep this area clean. Dust or paper bits can interfere with reloading.
Position Paper for Stapling
How you place your documents affects staple alignment and depth.
Align at the Front End
Place your stack of paper at the front end of the stapler, flush against the anvil. This is where the staple forms and locks. Avoid pushing too far back, as this can trigger reload sensors on electric models.
Choose Staple Angle
Some Bostitch staplers support two staple orientations.
90-degree straight stapling works best for standard binding. 45-degree slanted stapling helps bind thicker stacks or allows easier page turning. Rotate the anvil or switch the setting per your model instructions. Stick to one angle per job for consistency.
Expert Note: Use 90 degrees for reports and handouts. The 45-degree angle is better for notebooks or reusable binders.
Operate the Stapler Safely
The method changes slightly depending on your model type, manual, spring-powered, or electric.
For Manual and Spring-Powered Models
These require hand pressure but are designed for ease of use.
Follow these steps:
- Position the stapler squarely on the paper.
- Press the main handle down firmly.
- On models with a dual-lever system, press both the top handle and auxiliary lever at the same time.
- Release and lift. The staple is formed.
Pro Tip: Spring-powered versions allow one-finger stapling. Use the lever assist to reduce strain on your hand.
For Electric Models
No heavy pressing is needed with electric models. Just position and let the stapler do the work.
Follow these steps:
- Place the document at the front of the stapler.
- Press the stapler down slightly to activate the sensor.
- It fires automatically in under a second.
Thanks to Impulse Drive technology, electric models staple three times faster than manual ones. This makes them ideal for high-volume tasks like reports, mailings, or student packets.
Troubleshooting Tip: If the electric stapler does not fire, open and close it once. This resets the reload detection mode.
Staple on Flat Surfaces Properly
Working directly on a desk requires a specific routine to prevent sensor issues.
Follow this quick routine:
- Close the stapler completely before placing it down.
- Set it on the surface and open and close the arms once.
- Load paper and press down.
Why it matters: Sensor-based units may disable firing if they detect an open state during use. This routine prevents the stapler from thinking you are trying to reload when you are actually stapling.
Finish and Remove Documents
Once stapled, retrieving your papers is simple.
Pull Out the Stack
After firing, lift the stapler or slide the document out from between the jaws. No extra steps are required. Your stack is securely fastened.
Check staple quality: If legs are bent or not fully clinched, inspect for jams or low power on electric models.
Use the Built-In Staple Remover
Made a mistake? Most Bostitch staplers include a remover at the back.
Follow these steps:
- Slide the tool under the staple crown.
- Twist or pry upward to loosen the legs.
- Lift straight out.
This works on paper, thin cardboard, and fabric labels. It is great for correcting errors or recycling pages.
Warning: Do not use excessive force. The remover is designed for light-duty removal only.
Prevent and Clear Jams

Even with No-Jam technology, jams can happen, especially if staples are loaded wrong.
Clear a Jam Safely
Follow these steps:
- Open the stapler fully.
- Look inside the magazine and anvil area for stuck staples.
- Use tweezers or the built-in remover to pull out obstructions.
- Recheck staple alignment and close securely.
Never use metal tools like screwdrivers. They can damage internal mechanisms.
Reduce Jam Risk
Follow these prevention tips:
- Always load staples point-down with the notch facing the bottom
- Do not mix staple brands or types
- Keep the feed path free of paper dust
Models with No-Jam technology handle misfeeds better, but proper loading is still essential.
Leverage Smart Features
Bostitch adds smart touches that boost efficiency and comfort.
Watch for the Refill Alert Light
Electric models have a low-staple indicator light. When it turns on, reload soon to avoid mid-job interruptions.
Set a reminder: Pair the alert with your weekly office supply check to stay stocked.
Trust the Suction Feet
The non-slip rubber feet with suction keep electric staplers steady during rapid firing. Press down gently to engage the suction, especially on glass or laminate desks.
Appreciate the Speed Boost
With Impulse Drive technology, electric Bostitch staplers deliver consistent, high-speed stapling. You can staple up to 20 sheets per minute without hand fatigue. This makes them perfect for batch processing.
Ideal for: Administrative staff, teachers, HR departments, and anyone doing repetitive binding.
Match Stapler to Your Needs
Not all Bostitch models are the same. Choose the right one for your workload.
For Heavy Office Use: Electric Staplers
Electric staplers work best for high-volume stapling, users with hand strain or RSI, and teams sharing a central station.
Pros: Fast, automatic, low effort. Cons: Requires outlet, higher cost.
For Light to Medium Tasks: Spring-Powered
Spring-powered staplers work best for one-finger operation, students or home offices, and frequent repositioning.
Pros: Portable, ergonomic, no power needed. Cons: Limited sheet capacity.
For Basic Jobs: Manual Desktop Models
Manual staplers work best for occasional stapling, budget-conscious buyers, and simple document prep.
Pros: Durable, low maintenance. Cons: Requires more hand pressure.
Always check the manual for model-specific limits like max sheet capacity and staple size compatibility.
Maintain Your Stapler Long-Term
A little care keeps your Bostitch stapler working like new.
Clean Regularly
Wipe the exterior with a dry or slightly damp cloth weekly. Clear paper fibers from the anvil and feed path with a soft brush or compressed air.
Avoid liquids or solvents. They can damage plastic and electronics.
Store Properly
Keep the stapler in a dry place, away from dust and moisture. If not used for weeks, remove leftover staples to prevent spring tension wear.
Know the Warranty
Most Bostitch staplers come with a limited warranty covering defects in materials and workmanship. Register your product online and keep the receipt.
Durability note: Built with industrial-grade materials, these staplers are made for daily office use.
Frequently Asked Questions About Using a Bostitch Stapler
How do I load staples into my Bostitch stapler correctly?
Open the stapler by pulling apart the top and bottom sections. Insert staples into the magazine with the pointed ends facing down toward the anvil. The notched side of the crown should face the bottom of the stapler. Push the strip fully in until it seats firmly, then close the stapler until it clicks.
Why is my Bostitch stapler jamming?
Jam occurrences typically stem from incorrect staple orientation. Ensure points are facing down and the notch is facing the bottom. Remove any bent or twisted staples from the magazine. Keep the feed path clean of paper dust and debris.
Can I use any staples in my Bostitch stapler?
Use only staples compatible with your specific model. Check your user manual for approved staple sizes. Mixing brands or types can cause jams and misfeeds, even in models with No-Jam technology.
How do I use the staple remover on my Bostitch stapler?
Locate the integrated remover at the back of the stapler. Slide it under the staple crown, twist or pry upward to loosen the legs, then lift straight out. This tool works on paper, thin cardboard, and fabric labels.
Are electric Bostitch staplers worth the extra cost?
Electric models cost more but offer significant benefits for high-volume users. They staple three times faster than manual models, reduce hand strain, and feature automatic operation. They also include helpful features like refill alert lights and suction feet for stability.
How do I prevent my electric stapler from thinking I am reloading?
Always close the stapler completely before placing it on a flat surface. After setting it down, open and close the arms once to ensure it is in staple mode rather than reload detection mode. This prevents the sensor from disabling firing.
Key Takeaways for Using Your Bostitch Stapler
Whether you are using an electric, spring-powered, or manual Bostitch stapler, the key to smooth operation lies in three main areas. First, correct staple loading with points down and notch facing the bottom prevents the majority of jams. Second, proper positioning at the front end against the anvil ensures clean, consistent staples every time. Third, understanding your specific model features like the refill alert light, suction feet, and integrated remover maximizes efficiency.
Regular maintenance extends the life of your stapler. Clean the exterior weekly, keep the feed path clear of debris, and store in a dry location. For electric models, watch the refill alert light and address jams immediately using tweezers or the built-in remover rather than metal tools.
Choose the right stapler model for your workload. Electric models suit high-volume office environments, spring-powered options work well for moderate use with ergonomic needs, and manual models serve basic occasional stapling. Now that you know how to use a Bostitch stapler the right way, you are ready to staple smarter, not harder.