
Fix Bostitch Air Nailer: Quick Repair Steps
If your Bostitch air nailer won’t fire or is hissing air from the trigger or nose, you’re not alone. Air leaks and failure to cycle are common symptoms of worn internal seals, especially in older or infrequently used tools. The good news? Repairing a Bostitch air nailer is often a 5-minute fix once disassembled and ranks only a 3 out of 10 in difficulty for DIYers with basic mechanical skills. Whether you’re dealing with a framing nailer, roofing model, or coil gun, most issues stem from failed O-rings, a faulty trigger valve, or a worn piston bumper. This guide walks you through diagnosing the problem, selecting the right rebuild kit, and completing the repair safely and correctly, saving you hundreds compared to replacement.
Identify the Problem First

Before disassembling your nailer, confirm the issue with simple diagnostic checks. Most repairs begin with recognizing where and how air escapes.
Listen for Air Leak Locations
Connect the air hose (with no nails loaded) and pull the trigger. Listen closely:
• Hiss near the trigger? Likely a failing trigger valve.
• Leak from the nose or cylinder cap? Worn O-rings or piston bumper.
• No fire, but air escapes internally? Could be a damaged cylinder seal or cushion pad.
Even minor leaks reduce driving power and efficiency. If the tool fires inconsistently after sitting idle, try the lubrication test before tearing it down.
Try the Lubrication Test
Add 3 to 5 squirts of pneumatic tool oil into the air inlet. Reconnect and fire the tool a few times. Dry seals can stick or crack, and oil may temporarily reseal them. If performance returns, it’s a sign you need a full rebuild soon, but not necessarily immediately.
Confirm Your Exact Model
Bostitch models like the N80 series or RN46 look similar but use different seals. Always locate the model number stamped on the body. For example:
• N80S, N80SB, SDN11RH → Framing nailers (use ORK11 or N80-specific kits)
• RN46 → Roofing nailer (needs RN46-RK or 191777 bumper plus TVA6)
• N79, N88, N90 series → Coil nailers (often use TVA11 trigger valve)
Using the wrong kit leads to leaks or assembly issues. When in doubt, check exploded diagrams at ereplacementparts.com.
Replace the Trigger Valve
The trigger valve is the most common failure point. When it leaks, air escapes without firing the piston. Replacement is fast and effective.
Choose OEM vs Aftermarket TVA6 or TVA11
• TVA6: Used in most framing and roofing nailers (N80, RN46).
• OEM (Stanley/Bostitch): ~$30
• Generic (eBay/Amazon): ~$10
• TVA11: Common in coil nailers (N79, N88, N90).
• Price: ~$9.99, high seller volume (50+/month)
Warning: Many users report generic valves don’t seal properly or fit loose. If a $10 valve fails, you’ll end up buying the $30 OEM part anyway. For reliability, start with OEM or high-rated aftermarket (4.5+ stars, 50+ reviews).
Remove and Replace the Cartridge
- Disconnect air and clear nails.
- Locate the trigger valve housing, usually a cylindrical unit behind the trigger.
- Unscrew the retaining nut or pull the pin securing the valve.
- Slide out the old cartridge.
- Insert the new one, ensuring alignment.
- Re-secure with the nut or pin.
No internal disassembly needed. Replacing the entire cartridge is faster and more reliable than trying to rebuild it.
Rebuild with a Full Kit
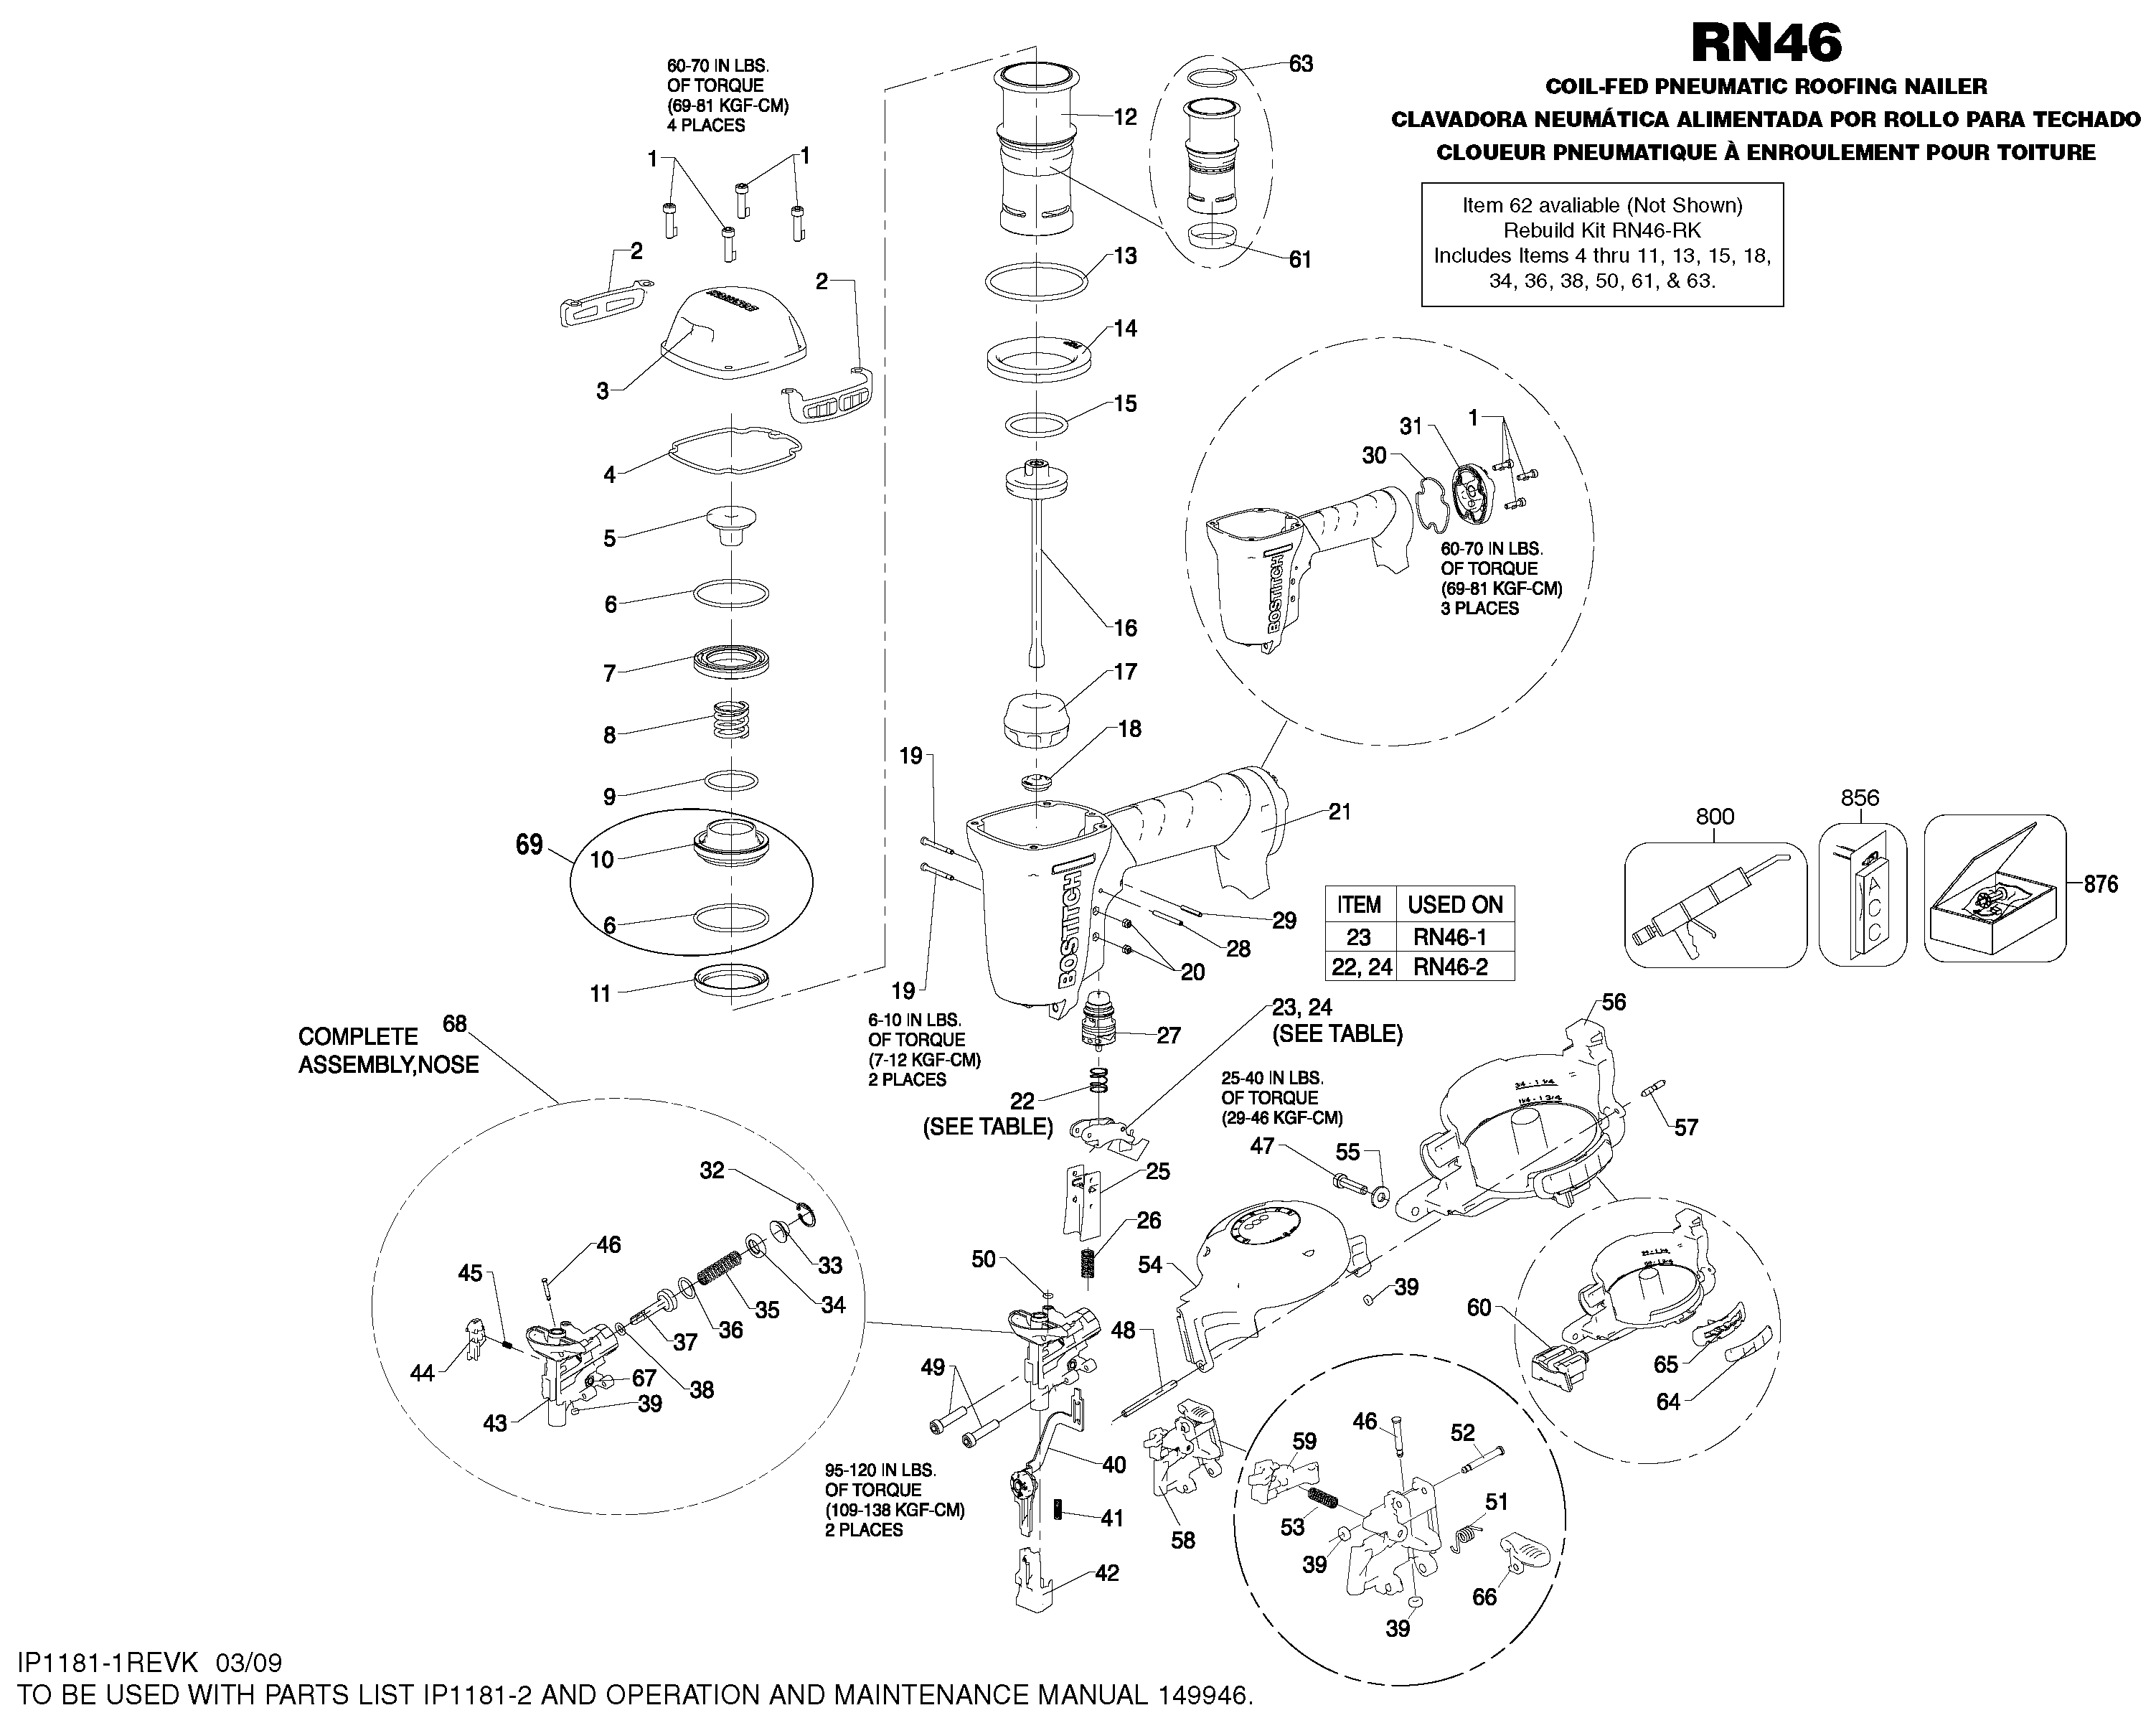
For tools that have sat unused or show multiple leaks, a complete O-ring and seal kit is the best fix.
Pick the Right Rebuild Kit
Match the kit to your model. Here are top-performing options:
Framing Nailers (N80 Series)
| Kit Type | Price | Key Components | Notes |
|---|---|---|---|
| ORK11 Maintenance Kit | $18.49 | Seals for N70–N95 series | Best value for preventive maintenance |
| Overhaul Kit (Generic) | $25.99–$38.99 | Full internal seals | Look for 4.2+ rating and stock availability |
| Rebuild Kit (ORK11/p801) | $28.11 | Needle, pad, ring, cushion | Includes hard-to-find parts |
Roofing Nailer (RN46)
| Kit | Price | Includes | Recommendation |
|---|---|---|---|
| RN46-RK (OEM) | $36.12 | Full rebuild | Most reliable |
| 191777 + TVA6 Kit | $26.99 | Bumper, trigger, O-rings | Critical wear parts only |
| Generic RN46 Kit | $16.99 | Basic seals | Budget option, 10% off 2+ |
Coil & Flooring Nailers
• TVA11 Trigger Valve: $9.99 (fits N79, N88, N90)
• F28WW Kit: $18.89 (for F28WW, F21PL)
• MCN-RK: $19.99 (MCN150/250 coil nailers)
• Hardwood Floor Kit: $12.99 (O-rings for MIII series)
Pro Tip: Avoid random O-rings from bulk packs. Incorrect size or material (e.g., non-nitrile rubber) leads to rapid failure.
Follow Safe Disassembly Steps

Even simple repairs require care. Small parts can fly or get lost under pressure.
Disconnect and Clear First
- Unplug the air hose.
- Empty the magazine so no nails are inside.
- Set the trigger to sequential mode (finger-pull) for safer testing later.
Disassemble Using the Diagram
- Find the exploded view for your model online (e.g.,
ereplacementparts.com). - Work on a clean towel or magnetic mat to catch springs and pins.
- Remove the cylinder cap, then the piston assembly.
- Note the order of O-rings, washers, and pads.
- Remove the trigger valve, piston bumper (Part #191777 for RN46), and cylinder seals.
Inspect as You Go:
• Check piston and cylinder wall for scratches or scoring.
• Replace the piston bumper if cracked or flattened.
• Discard all old O-rings, even if they look intact.
Lubricate Before Reassembly
Apply pneumatic tool oil to:
• All new O-rings
• Piston shaft
• Trigger valve seals
• Cylinder bore
This prevents dry starts and extends seal life.
Reassemble in Reverse Order
- Reinstall the piston bumper and cylinder seals.
- Slide in the piston, ensuring O-rings aren’t pinched.
- Replace the cap and tighten securely.
- Insert the new trigger valve and secure it.
- Double-check all pins and springs are seated.
Test Safely After Repair
Never test at full pressure right away. A misaligned seal can blow out violently.
Start with Low Pressure
- Reconnect air at 40 to 60 PSI (well below operating range).
- Fire the tool without nails 5 to 10 times.
- Listen and feel for leaks at the trigger, nose, and cap.
If you hear a hiss, disassemble and check:
• O-rings seated fully?
• Trigger valve properly installed?
• Cap tightened evenly?
Confirm Full Function
Once leak-free at low pressure:
1. Increase to normal operating PSI (typically 80–100).
2. Load nails and fire in sequential mode.
3. Check for consistent depth and no kickback.
Pro Tip: Use sequential mode for precision and safety, especially for homeowners. Bump fire increases accident risk.
Prevent Future Failures
A successful repair can last years with proper care. Avoid repeat issues with these habits.
Oil Regularly
Apply 3 to 5 drops of pneumatic oil into the air inlet:
• After storage
• Every 4 to 5 hours of use
• Before long-term storage
Dry tools develop brittle seals fast.
Replace Seals Proactively
If your nailer has sat unused for 6+ months, rebuild it before relying on it. Old rubber cracks silently.
Buy Quality Parts
Stick to:
• OEM kits (Bostitch/Stanley)
• High-rated aftermarket (4.3+ stars, 25+ reviews)
• Model-specific kits, not universal “fits most” packs
Avoid mystery O-rings from unknown sellers. They cost less but fail faster.
When to Use a Service Center
If you’re uncomfortable with disassembly or the repair fails twice, consider professional help.
Find an Authorized Bostitch Repair Shop
- Use the official online locator.
- Canadian users: Enter only the first 3 digits of your postal code to get results.
- Choose between:
• Authorized service centers
• Factory-owned service centers (often faster, higher expertise)
While professional labor and OEM parts can cost $50 to $100, it’s worth it for complex issues or vintage models.
Frequently Asked Questions About Bostitch Air Nailer Repair
Why is my Bostitch nailer leaking air from the trigger?
A hissing sound near the trigger almost always points to a worn trigger valve (TVA6 or TVA11). The internal seal deteriorates over time, allowing air to escape before reaching the piston. Replacing the entire cartridge solves the problem in most cases.
How long does it take to rebuild a Bostitch air nailer?
Once you have the tool disassembled, replacing the trigger valve or O-rings takes about five minutes. Including disassembly, lubrication, and testing, most DIYers complete the full repair in 30 minutes or less.
Can I use generic O-rings instead of a Bostitch rebuild kit?
Generic O-rings from bulk packs often have incorrect sizes or low-quality materials that fail quickly. Model-specific kits from OEM or high-rated aftermarket sellers (4.3+ stars) ensure proper fit and longer service life.
What is the difference between TVA6 and TVA11 trigger valves?
TVA6 is used in most framing and roofing nailers like the N80 and RN46 series. TVA11 fits coil nailers including N79, N88, and N90 models. Using the wrong valve leads to leaks or improper sealing.
How often should I oil my Bostitch air nailer?
Add 3 to 5 drops of pneumatic tool oil into the air inlet after storage, every 4 to 5 hours of active use, and before any long-term storage. Regular oiling prevents seals from drying out and cracking.
When should I take my nailer to a service center instead of repairing it myself?
If you’re uncomfortable with disassembly, if the repair fails twice, or if you own a vintage model with unavailable parts, an authorized Bostitch service center is the safer choice. Professional repairs typically cost $50 to $100 including parts and labor.
Key Takeaways for Successful Bostitch Air Nailer Repair
Most Bostitch air nailer problems trace back to three components: the trigger valve, O-rings, and piston bumper. Diagnosing the leak location first saves time and prevents unnecessary part replacement. A $15 to $40 rebuild kit paired with 30 minutes of work can restore a nailer that would otherwise cost hundreds to replace.
Your next step: identify your model number, order a matching rebuild kit, and walk through the lubrication test before full disassembly. With the right parts and basic safety precautions, your Bostitch nailer can run like new for years to come.