Milwaukee Framing Nailer Repair Guide
If your Milwaukee framing nailer won’t fire, jams constantly, or drives nails inconsistently, you’re dealing with one of the most common tool frustrations on the jobsite. Models like the 7100-20, 7200-20, and M18 Fuel 30-degree framing nailer all share similar failure patterns after heavy use. The encouraging news is that most problems trace back to a handful of root causes you can diagnose and fix yourself with basic tools and a little know-how.
This guide walks you through model identification, step-by-step troubleshooting, cleaning procedures, and parts replacement. You’ll learn exactly what to check first, what to skip, and when it’s time to call in professional service.
Identify Your Milwaukee Framing Nailer Model
Before touching anything, confirm which model you’re working on. Parts, procedures, and even nail compatibility differ between legacy and current versions.
Locate the Model Number and Build Year
Check the label on the tool body or battery housing for these identifiers:
– 7100-20 (A85A): Older gas-powered model from around 2007.
– 7200-20 (G98A): Updated version released around 2015.
– M18 Fuel 30-Degree Framing Nailer: Current cordless model with brushless motor.
Confirm Nail Compatibility
Using the wrong nails is a leading cause of jams and feed failures. Your tool requires:
– Nail type: Full round head only.
– Length: 2 inches to 3.5 inches.
– Angle: 30-degree collation.
Clipped-head or 21-degree nails may seem to fit but will cause feed failures. Always verify specifications before loading.
Diagnose Weak or Incomplete Nail Drives

When nails fail to sink flush, the cause is usually simpler than you think. Start with the easiest checks before assuming mechanical failure.
Check the Battery First
A low-charged M18 battery is the number one cause of weak drives. Insufficient voltage means the piston can’t generate enough driving force.
- Test it: Swap in a fully charged battery before disassembling anything.
- Warning signs: Slow piston return, faint click, or partial nail penetration even in softwood.
- Fix: Recharge the battery or replace it if you notice swelling, overheating, or rapid discharge.
Verify the Depth-of-Drive Setting
An incorrect depth setting mimics power loss and is often overlooked.
- Find the adjuster: Look for a knob or collar near the nose of the tool.
- Adjust: Turn clockwise for deeper drive, counterclockwise to reduce depth.
- Confirm: Test on scrap wood after each adjustment.
Suspect Air Pressure Loss
If battery and settings check out, internal air leaks are the likely culprit, especially in older or heavily used models.
Signs of a cylinder leak:
– Gradual performance decline over months.
– Works well at the start of the day but weakens by afternoon.
– Requires multiple trigger pulls to set a single nail.
Repair options:
– Professional recharge: Recommended for most users. Milwaukee or certified shops can repressurize the gas chamber safely.
– DIY repressurization: Only for skilled users with proper tools. The process involves disassembly, pressure testing, and refilling with nitrogen or compressed gas. Over-pressurization risks serious damage.
Pro Tip: Pressure loss is a known wear point in legacy 7100-20 and 7200-20 models. It’s not user error, just normal aging.
Clear Nail Jams and Feed Failures

Jams halt productivity and can damage the driver blade if ignored. Most originate from debris, weak springs, or incorrect nails.
Clean the Magazine and Circle Spring
Dirt and rust slow nail feed dramatically. In dusty environments, clean every 3 to 5 job days.
Follow these steps:
1. Remove the battery and clear all nails from the magazine.
2. Open the magazine latch and slide out the nail strip.
3. Inspect the circle spring (the coil that pushes nails forward).
4. Wipe interior rails with a dry cloth.
5. Spray WD-40 or a similar corrosion protector on moving parts only, never inside the firing chamber.
Visual cue: A kinked, rusted, or bent spring won’t push nails consistently and needs replacement.
Fix the “1/3 Full” Misfire Problem
Many users report misfires specifically when the magazine drops below one-third capacity. This is a spring tension issue, not a tool defect.
Why it happens:
– Weak spring tension fails to advance nails reliably.
– Debris blocks smooth magazine movement.
– Nails shift out of alignment when the clip is low.
Quick field fix:
– Push up on the rear of the nail clip with your palm while firing. If this restores function, the spring needs cleaning or replacement.
Permanent solutions:
– Replace a worn circle spring using a parts kit matched to your model.
– Clean magazine rails monthly as preventative maintenance.
– Always use correct 30-degree full round head nails without exception.
Stop Multi-Firing and Trigger Malfunctions
When your nailer clicks multiple times per trigger pull without driving nails, it’s unsafe and wastes fasteners. The cause is almost always in the trigger assembly or contact trip mechanism.
Inspect the Trigger Assembly
Wear in the trigger mechanism causes unintended re-firing and demands immediate attention.
What to check:
– Trigger pivot: Look for cracks or excessive play.
– Spring tension: Ensure the trigger snaps back fully after each pull.
– Debris buildup: Blow out dust with compressed air.
Cleaning procedure:
1. Remove the battery for safety.
2. Use an air nozzle to clear the trigger housing thoroughly.
3. Spray contact cleaner around the pivot point.
4. Work the trigger repeatedly to free any sticky components.
Test the Contact Trip Mechanism
This safety feature prevents accidental firing. When stuck or misaligned, it can cause double-taps.
How to diagnose:
1. Press the contact tip firmly against a work surface.
2. Pull the trigger. It should fire only when both are engaged simultaneously.
3. If it fires without contact tip depression, the mechanism is faulty.
Repair steps:
– Disassemble the front bumper to access the contact trip linkage.
– Clean all components with degreaser.
– Check for bent pins or worn plastic levers.
– Replace broken parts through Milwaukee’s official parts lookup.
Warning: Never disable the contact trip. It’s a critical safety feature that prevents serious injury.
Maintain Peak Performance
Preventive care extends tool life and prevents the majority of common failures before they start.
Follow a 3-Step Maintenance Routine
Step 1: Clean after every use
– Blow out dust from the magazine, nose, and vents.
– Wipe down the exterior to prevent corrosion.
Step 2: Lubricate moving parts weekly
– Apply WD-40 or equivalent to:
– Magazine rails
– Circle spring
– Trigger pivot
– Depth adjustment threads
– Avoid over-lubricating, since excess attracts sawdust.
Step 3: Verify nail specifications daily
– Confirm nail length and head type before loading.
– Never mix nail brands or sizes in the same clip.
Store Your Nailer Properly
- Keep it in a dry, temperature-stable environment.
- Remove the battery and nails for long-term storage.
- Set the depth adjuster to the mid-position to reduce spring stress.
Replace Failed Components
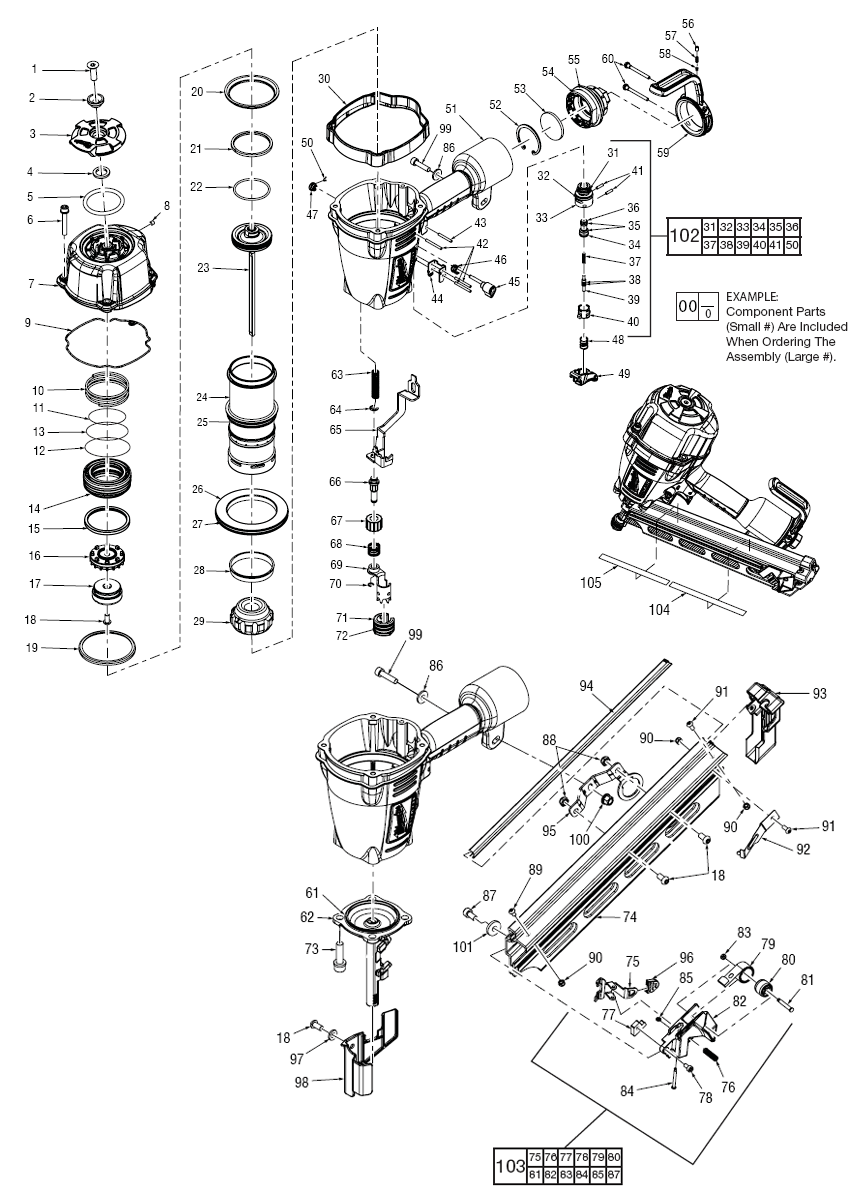
Some parts wear out and require replacement rather than repair. Knowing which parts to swap saves time and money.
| Part | Symptoms | Replacement Tip |
|---|---|---|
| Circle Spring | Misfeeds when magazine is low | Bend ends slightly outward for more tension |
| O-Rings / Seals | Air leaks, weak drive | Replace during professional service |
| Trigger Assembly | Multi-firing, sticky trigger | Use OEM Milwaukee parts for reliability |
| Battery | Overheats, won’t charge, short runtime | Match voltage (18V) and Ah rating |
Where to source parts:
– Milwaukee Factory Service: Best for cylinder recharging and internal repairs.
– Authorized Dealers: Carry genuine components.
– Online Retailers: Search by model number, such as “7200-20 circle spring.”
Expert Note: Aftermarket batteries often lack the surge power needed for full drives. Stick with Milwaukee M18 RedLithium batteries for consistent results.
Troubleshoot by Symptom
Use this quick-reference guide when you need a fast diagnosis.
Tool clicks but won’t fire:
– Check battery charge level.
– Clear any visible jam.
– Clean the firing pin area.
– Inspect the trigger return spring.
Nails jam frequently:
– Verify correct nail type and size.
– Clean the magazine and rails.
– Replace a damaged circle spring.
– Avoid damp or rusty nails.
Fires two nails per trigger pull:
– Inspect the trigger for wear.
– Clean the contact trip linkage.
– Replace a faulty trigger assembly.
Loses power over time:
– Rule out a low battery.
– Check the depth setting.
– Suspect an air leak and seek professional recharge.
Frequently Asked Questions About Milwaukee Framing Nailer Repair
Why does my Milwaukee framing nailer not sink nails all the way?
The most common cause is a low-charged M18 battery that cannot deliver sufficient voltage to drive the piston fully. Check the battery first, then verify the depth-of-drive setting. If both are fine, suspect internal air pressure loss in the cylinder.
What nails are compatible with Milwaukee framing nailers?
Milwaukee framing nailers require full round head nails in lengths from 2 inches to 3.5 inches, collated at a 30-degree angle. Using clipped-head or 21-degree nails will cause feed failures even if they appear to fit.
How do I fix a nailer that misfires when the magazine is low?
This “1/3 full” problem stems from weak circle spring tension. As a temporary fix, push up on the rear of the nail clip with your palm while firing. For a permanent fix, clean the magazine thoroughly or replace the worn circle spring.
Can I repressurize my Milwaukee nailer myself?
Technically proficient users can attempt DIY repressurization, but the process is tricky and risks damage if over-pressurized. Most users should send the unit to Milwaukee or an authorized service center for safe, reliable recharging.
Why does my nailer click multiple times without firing?
Multi-firing indicates wear or damage in the trigger assembly or a fault in the contact trip mechanism. Inspect the trigger pivot for cracks, clean debris from the firing pins, and verify the contact trip engages properly before each shot.
How often should I lubricate my Milwaukee framing nailer?
Apply WD-40 or a similar corrosion protector to moving parts weekly during regular use. Focus on the magazine rails, circle spring, trigger pivot, and depth adjustment threads. Avoid over-lubricating, as excess oil attracts sawdust and debris.
Key Takeaways for Milwaukee Framing Nailer Repair

Most Milwaukee framing nailer problems start with three simple checks: battery voltage, nail specifications, and cleanliness. Address these before assuming mechanical failure, and you’ll resolve the majority of issues without touching internal components.
For persistent weak drives that don’t respond to basic troubleshooting, suspect internal pressure loss and plan for professional servicing. Keep a spare M18 battery and a small cleaning kit on every jobsite to minimize downtime.
When trigger problems or multi-firing appear, stop using the tool immediately and inspect the safety mechanisms. A malfunctioning contact trip is a serious hazard that demands prompt repair.