Pneumatic Nailer Repair Guide
Your nailer sputters, hisses, or refuses to drive nails flush. That sudden failure mid-project costs time, money, and sometimes a trip to the ER. Pneumatic nailer repair is one of the most common service needs for contractors and serious DIYers, with air leaks, power loss, and intermittent firing leading the complaint list. Most breakdowns trace back to preventable causes: dried-out O-rings, clogged filters, or skipped lubrication. With the right diagnostic sequence and a clear repair-or-replace framework, you can often restore full function in under an hour. This guide breaks down how to identify the failure mode, execute safe fixes, and decide when replacement makes more sense.
Diagnose Air Leaks Fast

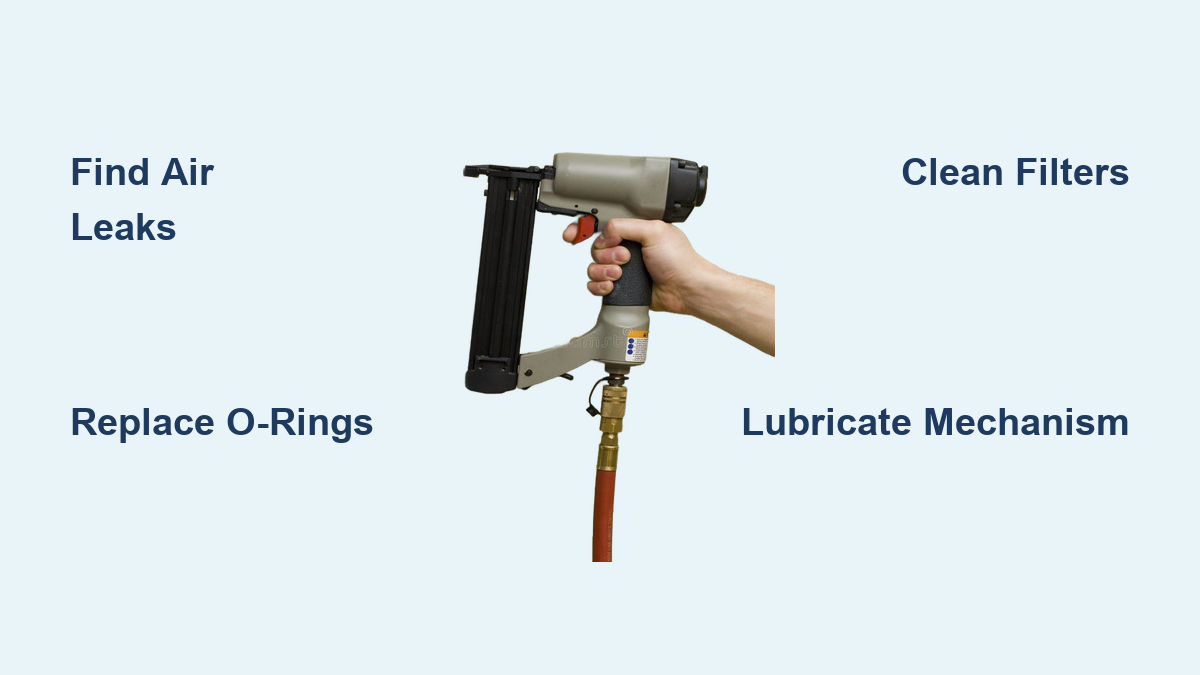
Air leaks top the list of pneumatic nailer failures because every escaped PSI is lost driving force. When compressed air bleeds out before reaching the piston, the tool cannot cycle or drive fasteners to depth.
Find the Leak Source
Start by connecting the tool to your air supply and listening for hissing. The most common escape points include:
– O-rings on the cylinder or piston
– Gaskets between housing sections
– Fittings at the air inlet or exhaust port
If the noise is not obvious, brush soapy water on suspected joints. Bubbles will pinpoint the exact leak location. Never run a leaking tool under pressure for long stretches, since this accelerates wear and increases injury risk.
Replace Worn Seals
Once you find the leak, repair requires disassembly:
1. Disconnect the air supply and bleed residual pressure.
2. Remove housing screws and open the body.
3. Identify the damaged O-ring or gasket.
4. Install an exact-match replacement using the manufacturer’s parts diagram.
5. Reassemble and test-fire into scrap wood.
Coat new O-rings with pneumatic tool oil before installation to prevent pinching and extend service life.
Restore Lost Power
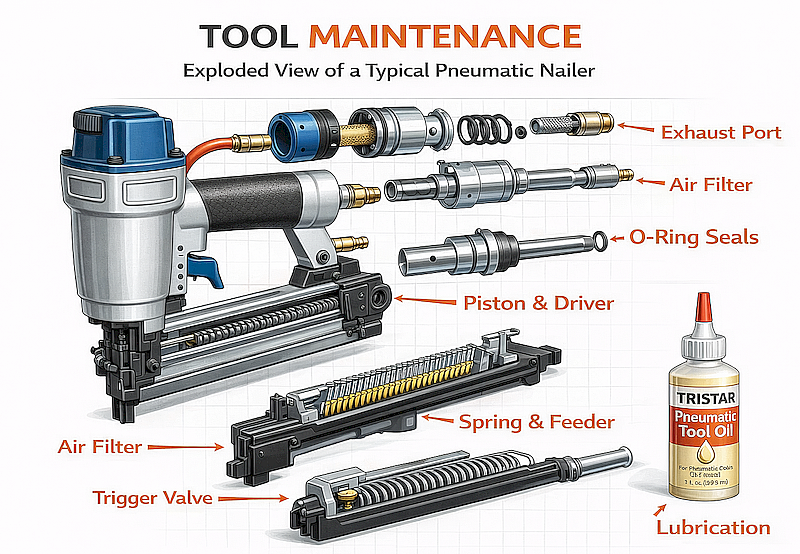
When your nailer fires but lacks driving depth, or stops cycling entirely despite adequate supply pressure, you are dealing with power loss. The usual suspects are contamination, poor lubrication, or worn internal components.
Clean Clogged Filters and Valves
Dirt and debris choke airflow and degrade performance fast:
– Remove the air filter near the inlet.
– Soak it in mineral spirits or blow it out with compressed air.
– Inspect for cracks or warping and replace if damaged.
– Check the intake valve for gummed oil or particulate blockage.
In heavily used tools, a clean filter alone can recover up to 30% of lost power.
Lubricate the Mechanism
Dry internals increase friction and wear exponentially:
– Add 3 to 5 drops of pneumatic tool oil into the air inlet.
– Fire the tool 10 to 15 times into scrap wood to distribute lubricant.
– Repeat monthly under normal use, weekly in dusty environments.
Avoid automotive or motor oils, which gum up under heat and pressure.
Replace Worn Pistons or Vanes
If cleaning and oiling do not solve the issue, internal wear is likely:
– Disassemble the motor or driver assembly.
– Inspect the piston for scoring or pitting.
– Check vanes for chipping or excessive play.
– Swap damaged parts using a rebuild kit or OEM components.
Reassembly must be precise, since misalignment causes binding or blow-by.
Fix Intermittent Firing Issues
The “sometimes it works, sometimes it doesn’t” complaint is frustrating but common. Erratic behavior usually points to trigger valve failure or internal clogging.
Test the Trigger Valve
A leaking trigger valve bleeds air slowly and prevents full pressure buildup:
– Disconnect air and disassemble the trigger housing.
– Inspect the valve seal for cracks or deformation.
– Soak in solvent to dissolve varnish from old oil.
– Replace if worn; many brands sell assemblies for under $40.
A $40 part can rescue a 10-year-old framing nailer from the scrap heap.
Clear Internal Blockages
Debris from nails, dirty air, or dried oil can jam moving parts:
– Fully disassemble the driver and valve chambers.
– Flush with brake cleaner or pneumatic tool solvent.
– Use compressed air to blow out narrow passages.
– Reassemble only when all components move freely.
Wear safety glasses, since high-pressure air can eject metal fragments.
Decide: Repair or Replace?
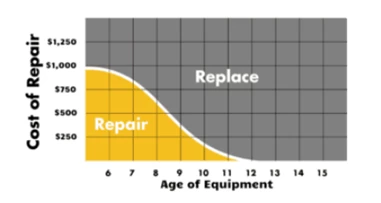
Not every nailer deserves a rebuild. Use a data-driven matrix to avoid wasting time and money.
Apply the 50% Cost Rule
If total repair costs exceed 50% of a new tool’s price, replacement is smarter. For example:
– A rebuild kit costs $110.
– A comparable new model costs $180.
– $110 is more than 50% of $180, so replace.
This rule prevents over-investment in aging equipment.
Evaluate Tool Age and Usage
Pneumatic nailers last 5 to 15 years. If yours is over 10 years old and needs major repair, replacement often wins:
– Older tools are prone to cascading failures.
– New models offer better efficiency, safety, and warranty support.
– Frequent repairs signal end-of-life.
A 12-year-old nailer needing a $100 rebuild will likely need another repair within a year.
Check Parts Availability
Before starting, verify parts are in stock:
– Search the manufacturer’s website using your model number.
– Call local suppliers or repair centers.
– Check rebuild kit lead times, which can run up to 3 weeks.
No parts means no repair. Consider upgrading to a current model with better support.
Follow Safety Protocols
Nail guns cause roughly 42,000 ER visits annually in the U.S., mostly hand and foot injuries. Safety is non-negotiable during repair and testing.
Depressurize Before Disassembly
Always follow this sequence:
1. Disconnect the air hose.
2. Pull the trigger to release residual pressure.
3. Confirm no air remains by attempting to fire while pointing the tool safely downward.
Working on a pressurized tool risks accidental discharge.
Use Proper PPE and Testing Procedures
When reassembling:
– Wear safety glasses and hearing protection.
– Test-fire into a wooden block or nail trap.
– Keep hands and body out of the nail path.
– Never bypass the safety contact tip.
OSHA mandates these steps, and following them protects you from life-altering injury.
Perform Preventative Maintenance
Prevention beats repair every time. A few minutes of routine care can extend your nailer’s life by years.
Oil After Every Use
Daily lubrication prevents 80% of common failures:
– Add 2 to 3 drops of oil into the air inlet.
– Fire 5 to 10 times to circulate.
– Use only oil rated for pneumatic tools.
Skipping this step causes internal parts to wear out three times faster.
Inspect Filters Weekly
Clogged filters starve your tool of air:
– Remove and tap out debris.
– Wash with soapy water if dirty.
– Let dry completely before reinstalling.
– Replace every 6 months under heavy use.
A clean filter ensures consistent power and faster cycling.
Check for Cracks and Corrosion
Monthly, inspect:
– Housing for stress cracks.
– Magazine for bent rails or rust.
– Fastener feed mechanism for smooth operation.
– O-rings for drying or cracking.
Catching small issues early prevents major breakdowns.
Choose the Right Repair Approach
Whether you DIY or hire a pro, know your options and their trade-offs.
DIY Repair for Common Failures
You can handle:
– O-ring and gasket replacement
– Trigger valve swaps
– Filter cleaning
– Basic lubrication
With a manual and basic tools (screwdrivers, wrenches, seal pick), these take 20 to 60 minutes.
Pro Tip: Buy a rebuild kit only if multiple seals are worn. For single issues, order individual parts to save 50% or more.
Use Professional Repair Services
For complex issues or when time and skill are limited:
– Seek shops like Fastenal or authorized service centers.
– Expect a $25 diagnostic fee, often waived if you proceed.
– Labor plus parts typically runs $100 to $150 for a full rebuild.
– Repairs usually include a 90-day warranty.
Turnaround ranges from same-day to 3 weeks, depending on parts availability.
Match Parts to Your Nailer Type

Using wrong parts causes jams and damage. Identify your tool’s category first.
Know Your Nailer Category
Common types include:
– Framing Nailer: 21° or 30° coil, 2 to 3.5″ nails
– Finishing Nailer: 15° or 16° stick, 1 to 2.5″ nails
– Brad Nailer: 18-gauge, 5/8 to 2″ brads
– Flooring Nailer: 16° or 20°, cleats up to 2.5″
Each has unique internal dimensions and fastener feed mechanisms.
Use Correct Fasteners
Never force incompatible nails:
– Check nail length, gauge, and collation type.
– Use only manufacturer-approved fasteners.
– Mismatched nails cause jams, broken drivers, and blown O-rings.
When in doubt, consult the manual.
Source Parts Smartly
Getting the right components fast keeps downtime low.
Buy Rebuild Kits vs. Individual Parts
Compare your options:
– Rebuild Kit ($80 to $120): Best for full restoration with multiple worn seals.
– Individual O-rings ($2 to $8 each): Best for single seal failure at low cost.
– Trigger Valve Assembly ($30 to $50): Best for intermittent firing without full disassembly.
Kits ensure compatibility but may include unneeded parts.
Verify Compatibility First
Before ordering:
– Note your nailer’s exact model number (e.g., Bostitch N80SB2).
– Visit the manufacturer’s parts page.
– Cross-reference diagrams to confirm part numbers.
Return policies vary, so buy from suppliers with easy exchanges.
Frequently Asked Questions About Pneumatic Nailer Repair
What is the most common cause of pneumatic nailer failure?
Air leaks from worn O-rings, degraded gaskets, or loose fittings are the leading cause. These leaks prevent the tool from building enough pressure to cycle or drive nails fully.
How often should I oil my pneumatic nailer?
Add 2 to 3 drops of pneumatic tool oil into the air inlet after every use, then fire the tool 5 to 10 times to circulate. Under heavy or dusty conditions, oil weekly instead of monthly.
When should I replace my nailer instead of repairing it?
Use the 50% rule: if repair costs exceed half the price of a new equivalent tool, replace it. Also consider replacement if the tool is over 10 years old, needs frequent repairs, or has unavailable parts.
Can I repair a pneumatic nailer myself?
Yes, for common issues like O-ring replacement, trigger valve swaps, filter cleaning, and lubrication. These take 20 to 60 minutes with basic tools. Full rebuilds with piston replacement require higher skill and precision.
How much does professional pneumatic nailer repair cost?
Most shops charge a $25 diagnostic fee (often applied to the final bill) plus $100 to $150 for labor and parts on a full rebuild. Repairs typically include a 90-day warranty.
Why does my nailer fire intermittently?
Intermittent firing usually points to a leaking trigger valve or internal clogging from debris or dried oil. Replacing the trigger valve assembly (often under $40) frequently resolves the issue.
Key Takeaways for Smart Pneumatic Nailer Repair
Most pneumatic nailer repair issues stem from preventable causes: dry internals, dirty filters, and worn seals. Diagnose accurately by listening for hissing, testing with soapy water, and checking filters before assuming internal damage. Follow the 50% cost rule and weigh tool age before investing in major repairs. Finally, commit to a simple maintenance routine: oil after every use, inspect filters weekly, and check for cracks monthly. These habits extend tool life far beyond a decade and keep your projects moving without interruption.