How to Recharge Milwaukee Framing Nailer
If you’re searching for how to recharge a Milwaukee framing nailer, the answer might surprise you: you don’t recharge the tool itself, you recharge its battery. The Milwaukee M18 FUEL 30-Degree Framing Nailer runs on a removable M18 REDLITHIUM™ battery, not gas cartridges or internal cells. This cordless system delivers pneumatic-like power without the mess or recurring cost of fuel cells.
In this guide, you’ll learn exactly how to charge your battery, choose compatible chargers, and build smart habits that keep your nailer firing all day. Whether you’re framing walls or setting trusses, mastering this system means fewer interruptions and more consistent performance on the job.
Understand the Milwaukee M18 FUEL Power System
Before charging anything, it helps to know what powers your tool. The Milwaukee M18 FUEL framing nailer uses a hybrid design that separates energy storage from driving force.
No Gas Cartridge Required
This nailer does not use a fuel cell or gas cartridge. There’s nothing to refill, replace, or prime. You get:
– No disposable fuel strips to buy
– No cold-weather misfires from sluggish gas
– No residue buildup in a combustion chamber
Instead, the tool uses a sealed compressed nitrogen spring to drive nails. This system is built to last the life of the tool and requires zero user maintenance.
Battery Powers the Electronics
The M18 REDLITHIUM™ battery provides electrical power to the POWERSTATE™ brushless motor and REDLINK™ Intelligence system. These components control:
– Instant trigger response with zero ramp-up time
– Firing speed of up to 3 nails per second
– Overload protection and thermal management
Without a charged battery, the tool simply won’t fire. Keeping batteries topped off is essential for uninterrupted work.
Identify the Correct Battery for Your Nailer
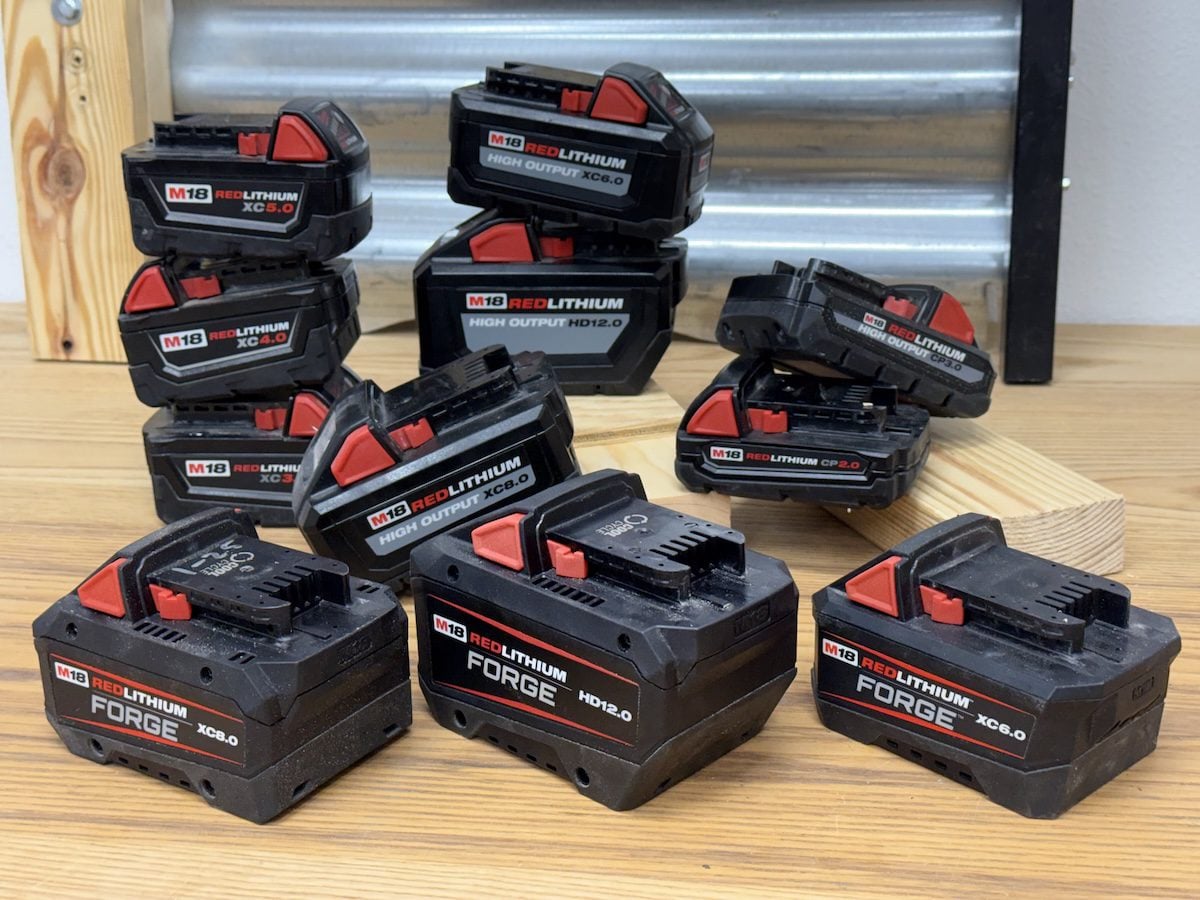
Charging starts with using the right battery. Get this wrong and you’ll face slow performance or unexpected shutdowns.
Use M18 REDLITHIUM™ Batteries Only
The tool is designed for Milwaukee M18 REDLITHIUM™ battery packs. While standard M18 batteries may physically fit, REDLITHIUM™ packs are engineered for high-drain tools like framing nailers. They deliver:
– Longer runtime under heavy load
– Better heat resistance during continuous use
– More charge cycles over the battery’s lifetime
Using off-brand or non-REDLITHIUM batteries can trigger REDLINK™ shutdowns and reduce firing speed.
Check Amp-Hour Ratings
Higher amp-hour (Ah) ratings mean longer runtime. For all-day framing, pair your nailer with a 9.0Ah HIGH OUTPUT pack. Smaller packs like 4.0Ah or 5.0Ah work fine for shorter jobs.
Note: Batteries are not included with the base nailer and must be purchased separately.
Remove and Insert the Battery Safely
Charging begins with removing the battery from the tool. Do this correctly to avoid damage or accidental firing.
How to Remove the Battery
- Power down the tool if it’s active
- Press the battery release button on the side of the handle
- Slide the battery down and out of the base
Always remove the battery before storing or transporting the nailer. This prevents accidental trigger pulls and preserves charge.
Inserting a Charged Battery
- Align the battery contacts with the tool’s slot
- Slide it upward until it clicks securely
- Test by pulling the trigger with the safety contact engaged
Pro Tip: Carry a second charged battery on-site. Swapping takes under 10 seconds for zero downtime.
Choose a Compatible Milwaukee M18 Charger

You can’t charge the battery while it’s in the tool. It must go into a standalone Milwaukee M18 charger.
Recommended Charger Options
Milwaukee offers several M18-compatible chargers:
– M18 C2 Charger: Charges most M18 batteries in 30–60 minutes
– M18 FC600 Fast Charger: Charges a 5.0Ah pack in about 25 minutes
– M18 & M28 Dual Voltage Charger: Ideal if you use both platforms
Avoid third-party or universal chargers. They may not support REDLITHIUM™ safety protocols.
Step-by-Step Charging Process
- Plug the charger into a standard 120V outlet
- Insert the REDLITHIUM™ battery into the charger
- Watch the LED indicator:
– Red: Charging
– Amber: Conditioning (battery is cold or needs balancing)
– Green: Fully charged
A 5.0Ah battery typically takes around 45 minutes on a standard charger. HIGH OUTPUT batteries charge faster on compatible fast chargers.
Charger Safety Tips
- Never leave batteries charging overnight unattended
- Charge in a dry, well-ventilated area
- Don’t charge frozen or wet batteries
- Unplug the charger after use
Monitor Battery Charge Levels On the Job
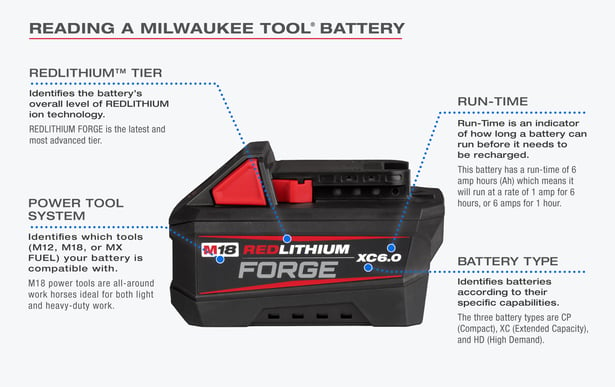
Knowing your battery’s charge level helps prevent mid-job failures. The REDLITHIUM™ system makes this easy.
Use the 4-LED Fuel Gauge
All REDLITHIUM™ batteries feature a side-mounted fuel gauge:
– Press the button to activate the LEDs
– 4 lights: 75–100% charged
– 3 lights: 50–75%
– 2 lights: 25–50%
– 1 blinking light: Below 25%, time to swap
Check charge levels at the start of each work session and during breaks.
Signs of Low Battery
When power drops, you may notice:
– Slower firing speed
– Delayed trigger response
– REDLINK™ system cutting out to prevent damage
Don’t wait for total failure. Swap batteries proactively.
Maximize Battery Life With Smart Habits

Smart charging habits extend battery lifespan and keep your nailer firing fast.
Avoid Full Discharges
Lithium-ion batteries last longest when kept between 20% and 80% charge. Try not to:
– Run the battery completely dead
– Leave it in the tool when not in use
– Store it fully discharged for weeks
If a battery dies on the job, recharge it as soon as possible.
Store Batteries Properly
For long-term storage:
– Charge to about 50% before putting away
– Store in a cool, dry place (60–70°F is ideal)
– Keep away from direct sunlight or heat sources
Batteries stored fully charged or fully drained can degrade faster.
Rotate Multiple Batteries
If you own two or more batteries:
– Rotate their use daily
– This balances wear across the set
– Always have one on the charger while using another
Troubleshoot Common Charging Issues
Even with the right setup, problems can occur. Here’s how to fix common charging failures.
Battery Won’t Charge
Check these first:
– Is the charger plugged in and powered?
– Are the battery and charger contacts clean?
– Is the battery extremely hot or cold? Let it return to room temperature first
If the charger light doesn’t turn on, try a different outlet or test with another M18 battery.
Charger Stuck on Amber
An amber light that won’t turn green may mean:
– The battery is too cold (below 40°F)
– The battery is aging and holding less charge
– The internal protection circuit is active
Let the battery warm up, then retry. If the problem persists, the battery may need replacement.
Tool Doesn’t Power On With a Charged Battery
If the nailer won’t fire:
1. Remove and reinsert the battery
2. Check for debris in the battery slot
3. Test with a different known-good battery
If there’s still no power, refer to the Framing Nailer Service Guide for further troubleshooting.
Prevent Common Mistakes That Waste Time
Avoid these errors that damage equipment and cost productivity.
Using the Wrong Battery
Standard or low-capacity M18 batteries may work briefly but will:
– Overheat under load
– Drain quickly
– Trigger REDLINK™ shutdowns
Always use REDLITHIUM™ packs for framing nailers.
Reinserting a Hot Battery
After heavy use, the tool and battery get hot. Never:
– Reinsert a hot battery into the charger
– Store a hot battery in direct sun
Let it cool for 10–15 minutes first.
Ignoring the Fuel Gauge
Waiting until the tool dies means lost time. Check the gauge every hour during continuous use.
Frequently Asked Questions About Recharging a Milwaukee Framing Nailer
Does the Milwaukee framing nailer use gas cartridges?
No. The Milwaukee M18 FUEL 30-Degree Framing Nailer uses a sealed compressed nitrogen spring system, not gas cartridges. The only thing you recharge is the M18 REDLITHIUM™ battery.
How long does it take to charge an M18 battery?
Charging time depends on the battery capacity and charger model. A 5.0Ah battery takes about 45 minutes on a standard M18 charger. Fast chargers like the M18 FC600 can charge a 5.0Ah pack in around 25 minutes.
Can I use any M18 battery in the framing nailer?
The tool is designed for M18 REDLITHIUM™ batteries. Standard M18 batteries may fit but can overheat, drain quickly, or trigger REDLINK™ protection shutdowns under heavy use.
How do I know when my battery is fully charged?
The charger LED turns green when charging is complete. You can also press the fuel gauge button on the battery itself to check the charge level.
Do batteries come with the Milwaukee framing nailer?
No. Batteries are not included with the base tool and must be purchased separately. Kits that include batteries and chargers are available.
How should I store batteries when not in use?
Store REDLITHIUM™ batteries at about 50% charge in a cool, dry place between 60–70°F. Avoid extreme temperatures and direct sunlight.
Key Takeaways for Recharging Your Milwaukee Framing Nailer
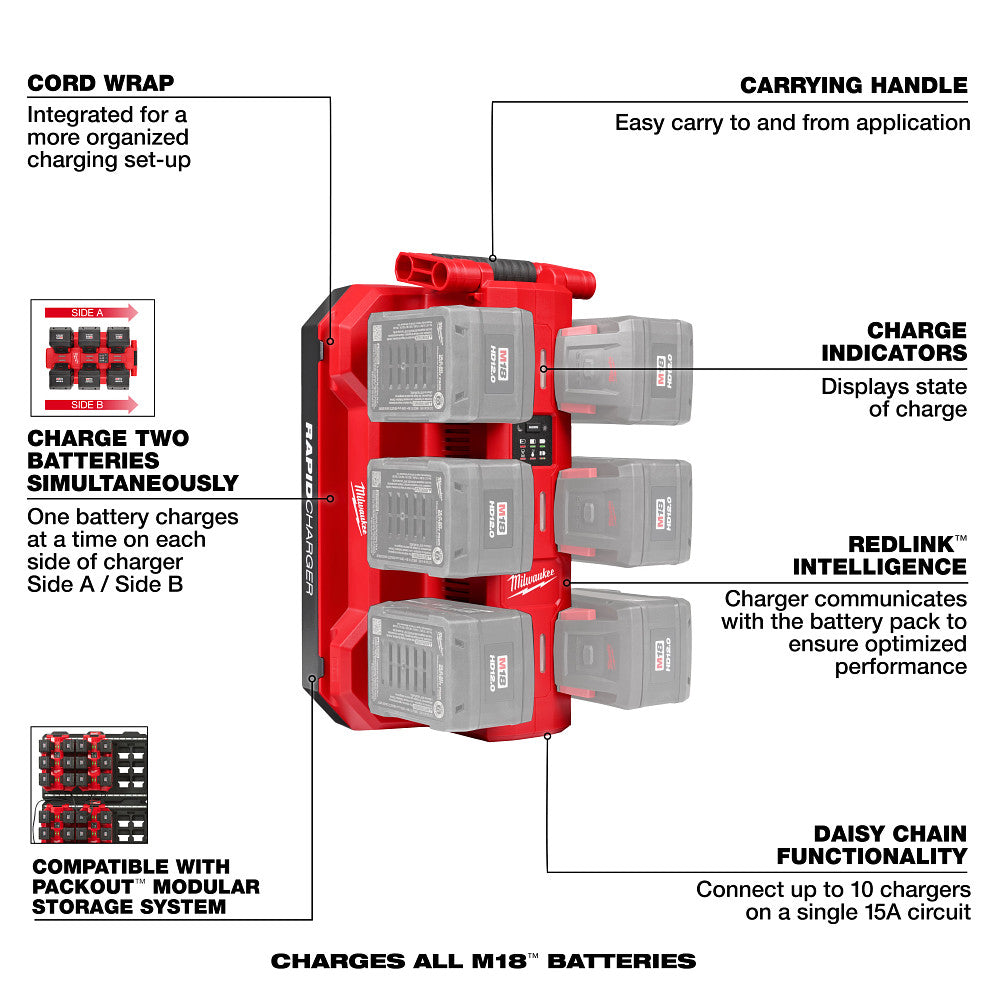
The Milwaukee M18 FUEL framing nailer doesn’t require traditional “recharging.” Only its removable REDLITHIUM™ battery needs power, and it charges through a compatible M18 charger. By understanding this system, using the right battery, and following smart charging habits, you’ll maximize runtime and eliminate the cost of gas cartridges.
Keep spare batteries on rotation, monitor charge levels with the fuel gauge, and always use Milwaukee-approved chargers. Start by checking your current battery’s charge level, then set up a dedicated charging station on-site so you always have a fresh pack ready to swap in.